Showing posts with label Flappy Bird. Show all posts

Tuesday, February 11, 2014

Flying Fox Part 1 (Game Programming)

Okay, I'm interested in Flappy Bird, but not because of the success and drama. What interests me is that it is a one-finger game. This works for touch and I think has something to look at. So I'm now going to create a similar game that just uses a finger to move the hero forward.

But I've been intrigued by this ever since I reviewed Captain Rogers. You could say that Captain Rogers is the same as Flappy Bird, in that you are flying through something and avoiding something and that the mechanism is the same. At first I didn't like the game because it was too hard, and I don't like Flappy Bird either. But the mechanic is interesting, so I'm going to create a game that uses touch and moves an object through an always-scrolling maze. But I need something that flies. How about a fox?


This is an image created by Nicu Buculei of Romania, who has been doing cool SVG tutorials for years. This image grew out of a tutorial called Pac-Man baddies with Inkscape and is available on the OpenClipart.org site (where I get all my clip art from). I really love SVG and this game will be done in SVG, using our fox-like friend, who can magically fly.

In earlier SVG game posts, I've just concentrated on shapes like squares and circles, but it's time to take wings and fly. But how to use a beautiful work of art in SVG? You can see the source code for this work of art at http://openclipart.org/detail/19560/game-baddie:-fox-by-nicubunu and I won't paste it in here because it takes up several hundred lines. Now Nicu didn't plot out the art by hand, he used Inkscape, which makes the details of the SVG art hidden, and all you need to do is use the art.

The game will let you keep the fox flying by tapping on the screen. Here's a screen shot of what it looks like on my Geeksphone Peak (now running in FxOS 1.2):


Tap and he flied upward. Don't do anything, and the fox falls! In later posts I'll show how to scroll and how to draw in the obstacles, but being able to import an SVG file is enough for now.
Here is the code for Part 1.

<!DOCTYPE HTML>
<html>
<head>
  <meta charset="utf-8">
  <title>
    Flying Fox Part 1
  </title>
 
  <style>
        
    #mySVG
    {
      width: 360px;
      height: 620px;
      position: absolute;
      top: 0px;
      left: 0px;
    }
     
  </style>


  <script>

  // --- Global variables ---

  // Width and height of board in pixels
  var boardWidth = 360;
  var boardHeight = 620;
  var boardWidthPixels = boardWidth + "px";
  var boardHeightPixels = boardHeight + "px";

  // URL for W3C definition of SVG elements
  var svgURL = "http://www.w3.org/2000/svg";
  var svgLink = "http://www.w3.org/1999/xlink";

  // Variables for fox initial position.
  var foxX = boardWidth / 2 - 100;
  var foxY = boardHeight / 2;
  var foxH = 50;
  var foxW = 50;

  // Use requestAnimationFrame.
  var requestAnimationFrame =
  window.requestAnimationFrame ||
  window.mozRequestAnimationFrame ||
  window.webkitRequestAnimationFrame ||
  window.msRequestAnimationFrame;

  // --- Event listeners ---

  // Page load event listener.
  window.addEventListener("load",
    runFirst, false);

  // Runs when page loads.
  function runFirst() {

    // Define the game board as an SVG element.
    gameBoard =
      document.createElementNS(svgURL, "svg");

    // Width and height of the SVG board element.
    gameBoard.width.baseVal.valueAsString =
      boardWidthPixels;
    gameBoard.height.baseVal.valueAsString =
      boardHeightPixels;
    gameBoard.id = "mySVG";
   
    // You must append the board to the body.
    document.getElementById("pageBody").
      appendChild(gameBoard);

    // Add a background element for color.
    gameBack =
      document.createElementNS(svgURL, "rect");
    gameBack.x.baseVal.valueAsString =
      "0px";
    gameBack.y.baseVal.valueAsString =
      "0px";
    gameBack.width.baseVal.valueAsString =
      boardWidthPixels;
    gameBack.height.baseVal.valueAsString =
      boardHeightPixels;       
    gameBack.style.
          setProperty("fill","Thistle","");
         
    // Attach the background to the game board.
    gameBoard.appendChild(gameBack);

    // Mouse down event listener
    gameBoard.addEventListener(
      "mousedown", foxJump, false);
       
    // Import SVG fox image.
    // Set height, width, x, and y.
    myFox = document.createElementNS(svgURL,"image");
    myFox.setAttribute("height",foxH);
    myFox.setAttribute("width",foxW);
    myFox.setAttribute("x",foxX);
    myFox.setAttribute("y",foxY);
   
    // Use different namespace for xlink.
    myFox.setAttributeNS(svgLink,"href","fox.svg");
   
    // Add the fox to the game board.
    gameBoard.appendChild(myFox);
   
    // Start the game loop.
    gameLoop();
  }

  // Game loop.
  function gameLoop(){

    // Endless loop with requestAnimationFrame.
    requestAnimationFrame(gameLoop);

    // The fox waits to drop.
    // Only you can save him.
    foxWait();
  }

  // Fox is waiting to fall.
  function foxWait() {
 
    // Make the fox fall after one second.
    foxFallTimer = setTimeout(foxFall, 1000);
  }
 
  // Fox is falling.
  function foxFall() {
 
    // Make the fox fall one pixel.
    foxY = foxY + 1;
   
    // Does he hit the floor?
    if (foxY > (boardHeight - 50)){
     
      // Calculate new position.
      foxY = (boardHeight / 2) - 50; 

      // Alert and reset.
      alert("Fox hit the floor!");
      console.log("Fox hit the floor!");
      return;
    }

    // Draw the fox.
    myFox.y.baseVal.valueAsString =
      foxY + "px";
     
    // Report progress.
    console.log("Fox is falling.");
  }
 
  // Fox is jumping.
  function foxJump() {
 
    // Fox jumps up!
    foxY = foxY - 20;
   
    // Does he hit the roof?
    if (foxY < 20) {
     
      // Calculate new position.
      foxY = (boardHeight /2) - 50; 
     
      // Alert and reset.
      alert("Fox hit the roof!");
      console.log("Fox hit the roof!");
      return;
    }
   
    // Otherwise, draw the fox.
    myFox.y.baseVal.valueAsString =
      foxY + "px";
   
    // Report progress.
    console.log("Fox is jumping.");  
  }

  </script>
  
</head>

<body id="pageBody">
</body>

</html>


A lot of this code is similar to other SVG posts I've written, and here's a brief outline.

Shell

Uses the standard HTML5 shell for SVG. For a detailed explanation, see this post: http://firefoxosgaming.blogspot.com/2013/11/bouncing-svg-part-3-game-programming.html.
I have some globals, I set up an event listener, and then start running the game when the page loads.

Game Loop

The game runs in a game loop, using requestAnimationFrame for the basic display timing.

Action

Every time through the game loop, the program goes to a waiting routine that waits one second. After the second has passed, the fox falls a small amount. If the fox hits the ground, the game is reset.

Touch

But to keep the fox from falling, you can tap the screen. I use the mousedown event in much the same way I did in the post Touch and SVG Spirals. Tap on the screen, trap the tap with an event handler, and then move the fox up. But be careful. If the mouse hits the roof, the game is also reset.

SVG

The real meat of this is importing the SVG image. Here's the code that does this:

    // Import SVG fox image.
    // Set height, width, x, and y.
    myFox = document.createElementNS(svgURL,"image");
    myFox.setAttribute("height",foxH);
    myFox.setAttribute("width",foxW);
    myFox.setAttribute("x",foxX);
    myFox.setAttribute("y",foxY);
   
    // Use different namespace for xlink.
    myFox.setAttributeNS(svgLink,"href","fox.svg");
   
    // Add the fox to the game board.
    gameBoard.appendChild(myFox);


This code is in three steps:

1. Create an SVG element called myFox using the SVG image element. Define the height, width, x, and y values to give it a location and size. foxX and foxY will determine where the fox is placed.

2. Then we must import the fox, which is in a separate file called fox.svg. We do this by using a magic technology called XLINK. One of the tricks to working with SVG is to remember that under the hood, SVG is XML, not HTML. Even though HTML5 has graciously allowed SVG to come and live in their house, SVG is still an XML animal. And XLINK is a linking protocol that was designed for XML. To use XLINK, you must introduce a separate namespace. SVG has one and now XLINK does too. Up in the globals, I defined svgLink as the namespace for XLINK, so you must use that when you invoke it, because it isn't part of HTML5 or SVG. But it works just fine. You import it by adding the href attribute to the SVG object myFox and then supply the URL, which in this case is just the filename, fox.svg. Complicated, but you only need to learn it once.

3. Then, once you've created the SVG image and imported the art into the image, you just need to add the image to the main SVG object, gameBoard. The image is now part of the SVG drawing and you can manipulate it all you want through JavaScript.

The fox is now ready to fly. Load this into your phone, watch the fox fall, and then tap to keep him from falling to the floor or hitting the roof.

Background

I had one problem with this that I needed to fix. In my last post when I was raving about how cool App Manager was, I showed a preliminary screen shot of the game I'm writing about now.


You'll notice that the top and left edges show a white margin. That's not what I wanted, and it made me dig out my old code from my post on screen sizes: http://firefoxosgaming.blogspot.com/2013/10/how-big-am-i-game-programming.html. Turns out that I hadn't measured the screen with my code and the new code showed this:


My inner screen size was now 360 x 620 pixels. So I added an SVG rectangle that I could color just to show a completely solid background, helpful to see where the fox is. Here's the code I used:

    // Add a background element for color.
    gameBack =
      document.createElementNS(svgURL, "rect");
    gameBack.x.baseVal.valueAsString =
      "0px";
    gameBack.y.baseVal.valueAsString =
      "0px";
    gameBack.width.baseVal.valueAsString =
      boardWidthPixels;
    gameBack.height.baseVal.valueAsString =
      boardHeightPixels;       
    gameBack.style.
          setProperty("fill","Thistle","");
         
    // Attach the background to the game board.
    gameBoard.appendChild(gameBack);


Standard stuff, just a rectangle. Define it, attach it, color it "Thistle", and you're done.

But when I loaded it into my phone, it still had that damn margin. I check and all browsers give you a margin when you throw an SVG object at them.

But when things don't work, there is the cousin of SVG, known as CSS! By simply giving the SVG board an ID, I could then place it exactly where I want it to go with some simple CSS. I understand browser manufacturers wanting to give a little margin (I don't think this was always true), but I want the game to go right to the edge.

So I added this CSS and everything fit perfectly:

  <style>
        
    #mySVG
    {
      width: 360px;
      height: 620px;
      position: absolute;
      top: 0px;
      left: 0px;
    }
     
  </style>


How cool is that? The mixture of HTML5, CSS, JavaScript, and SVG is really rocking. And thank you to Nicu for sharing with the world how to draw SVG and make it look good.

But it also makes me see that you have to be sure of what your screen is. I'm thinking I might clean up my "How Big?" app and putting it in the Marketplace for other programmers. We will be having more phones, tablets, and devices.

Next up, scrolling the screen.

Friday, February 7, 2014

Firefox OS Simulator R.I.P. (Game Programming)

I've been writing this blog for about 4 months and have written 73 posts, half of which are about programming games for the Firefox OS on the phone (the other half are reviews of Firefox OS games on the phone). I still have lots to write about on making games, but yesterday when I went to install the first part of a series on a new game type, the Firefox OS Simulator greeted me with this note:


I've been using the Simulator to install my game code on my two phones (ZTE Open and Geeksphone Peak) and it has never let me down. I knew there was a better solution from Firefox OS called App Manager, but it required that my phones have Firefox OS 1.2 or greater. And, having heard horror stories of phones being bricked, I wasn't eager to try to flash my phones. I use the Peak every day for programming so I didn't want to risk losing it, and there have been some problems with the ZTE Open.

But now this message worried me. I tried the Simulator and ... it didn't work! The latest "normal" Firefox is 26 and I'm usually working with Nightly, so I was in trouble. Well, maybe flashing my Peak won't be that hard. Well, it was hard, but I'm now the proud owner of a Firefox OS version 1.2 Geeksphone Peak.


More about the installation later, but the first thing I did once I had a working phone was to try out the App Manager. It is really worth the trouble, because it does lots more than the old Firefox OS Simulator (which helped me do about 35 posts). The features that stand out to me:


1. You can see a little more progress when the app is loading onto the phone. In the lower right corner, there is a nice little window that tells you you're connected and the status of your loading.

2. You can actually debug apps running on the phone with your PC. Here's an example of some console action, courtesy of the App Manager:


3. You can take screenshots by clicking on a button in the App Manager. You can even run  apps on your phone and do the screenshots from your PC! Taking screenshots is a pain. Here is a screenshot from the App Manager:


Here is a screenshot from the actual phone (Power Button + Home Button):


There are only minor differences, but the saving of time and trouble is nice. There's lots of other stuff I need to explore, but it works, and some of the other debugging features will come in handy as I do more complicated things. Especially for phone-only features that can't be simulated on the Simulator. No amount of tilting my PC will work on the Simulator for Device Orientation. The only small hassle is that the App Manager only works if you zip up all your files into a single package. If you make lots of changes, this can take a little bit of extra time. Fortunately for most Firefox OS features, you can just test out your app in the Firefox desktop browser, and that's a very fast turnaround cycle!

You can read all about the App Manager here: https://developer.mozilla.org/en-US/Firefox_OS/Using_the_App_Manager. App Manager isn't a plug-in, but comes with any Firefox browser that is version 26 or higher. When you first run it (from the Developer Menu), it will ask you to install a 1.2 or 1.3 simulator and some ADB software from our friends at Google Android (ADB = Android Device Bridge). 

So I'm busy at work and you might be guessing that my next post will be about a cute little fox who escaped from a Pac Man game written in another dimension. Later!

What Went Wrong?

Mozilla provides this great article on how to upgrade a Geeksphone: https://developer.mozilla.org/en-US/Firefox_OS/Developer_phone_guide/Updating_and_Tweaking_Geeksphone. Great except for one tiny thing that threw me off for an hour or two. I'll get to that, but first I'll outline the steps.

1. Make sure your phone and PC are ready. They recommend this article: https://hacks.mozilla.org/2013/05/pushing-firefox-os-apps-to-the-geeksphone/. Essentially you must have your drivers in order (especially if you have a Windows PC, which is what I used, and I expect a few others do also). Drivers in Windows are always "interesting" and especially anything to do with USB drivers is always a problem. The actual USB architecture is pretty lame, and tries to squeeze too much, too fast, through a thin pipe. But Device Manager is your friend (or perhaps the Girlfriend from Hell) and you can get it to work. I'm on Windows 7 and my PC is a four-year-old Asus laptop. Essentially for my setup, everything works if Device Manager shows me this:


2. Get the proper image of the new OS you want to flash to your phone. Geeksphone is very good about this (and ZTE Open not so good). They offer stable (1.2) and unstable (1.3) and nightly, and I picked 1.2 because that's all I need right now, to make App Manager sing.

Get it here: http://downloads.geeksphone.com/.

3. Make sure Remote Debugging is set up on your phone. I already did this (but checked) because you need this for the Firefox OS Simulator. It's in the Developer section of your phone.

4. Unzip the image you got in step 2 and put it somewhere on your PC so you can find it later. I stuck mine in the root of the D: drive.

5. Open up a Command Prompt window (also fondly known as the DOS Box, but DOS is only emulated these days). Navigate to your image folder. Tip: the folder name is really long, so you can just type the first few letters, insert an asterisk, and press Enter. Then, type:

                       flash.bat

Things will happen. Stuff is copied to your phone. And then ....

6. Something went wrong. I got stuck on an orange screen I'd never seen before. Turns out this is the Recovery Screen and very useful, but no combination of buttons did anything except get me back to this screen, and no phone in sight. An endlessly looping ... BRICK!

What I needed to be at was a different part of the phone innards called the FASTBOOT screen, black with a few options. But how to get there?

The instructions said:

If you are in the process of modifying your phone and it becomes “unresponsive” you should be able to recover it using fastboot with a simple procedure. The following illustrates resetting the Keon but other phones should have a similar process. You will also need to verify that you have fastboot installed.
First remove the USB cable and then remove the battery from the phone for 30 seconds. Then reinsert the battery and press the volume down button while holding the power button for a few seconds. Next reconnect the USB cable and run the following commands from a terminal window in the directory that contains the latest img files described in the first section of this post:
fastboot flash recovery recovery.img
fastboot flash boot boot.img
fastboot flash userdata userdata.img
fastboot flash system system.img
fastboot reboot
This process should recover your phone. If it doesn't seem to work, you may have to try it a second time.
I've read enough to know my ZTE may not have Fastboot, but I'll worry about that later. Peak has it but getting it is ... not exactly what they said. After removing the battery and putting it back in, no amout of pressing the Volume Down and Power did anything except keep bringing me back to the dreaded orange Recovery Screen.

I surfed the web and wore out my fingers on those hard buttons, and finally found one post somewhere that said to press Power AND the both the Volume Up and Volume Down buttons. Something is fiddly with those buttons, but pressing all three worked the first time and I was now in the Fastboot screen on my phone and was able to type the above commands in the command window. A few short moments later my phone rebooted and I was at version 1.2.

As a retired engineer I can appreciate that the Peak only has 4 buttons, and that two of them are attached at the hip. I've seen other phones that required some serious finger and hand stretching to get them to reboot the right way, but I would have preferred a pinhole in the back. For the Peak, I've seen the following ways to get to the magic Fastboot screen:

1. Power + Volume Down
2. Power + Volume Up
3. Power + Volume Up + Volume Down

And sometimes the order is important. #3 worked on the first try, #1 and #2 never worked for me. Just do this:

1. Take the battery out.
2. Unplug the USB cable  (essentially if you don't, the phone is still powered)
3. Wait 30 seconds.
4. Put the battery back in.
5. Press Power + Volume Up + Volume Down (all at once).
6. Plug in the USB cable.
7. Type these commands, one at a time, and let them do their thing:
fastboot flash recovery recovery.img
fastboot flash boot boot.img
fastboot flash userdata userdata.img
fastboot flash system system.img
fastboot reboot
 8. The phone will now reboot after the usual questions (time zone, etc.) you're done!

I couldn't take a screenshot of the Fastboot or Recovery screens, but I found some similar ones that will give you an idea of what they look like.

Recovery Screen

 Here is an image I found somewhere in G-land:


That one's for the ZTE but the Peak recovery screen is orange and has a few more options.

Flashboot Screen

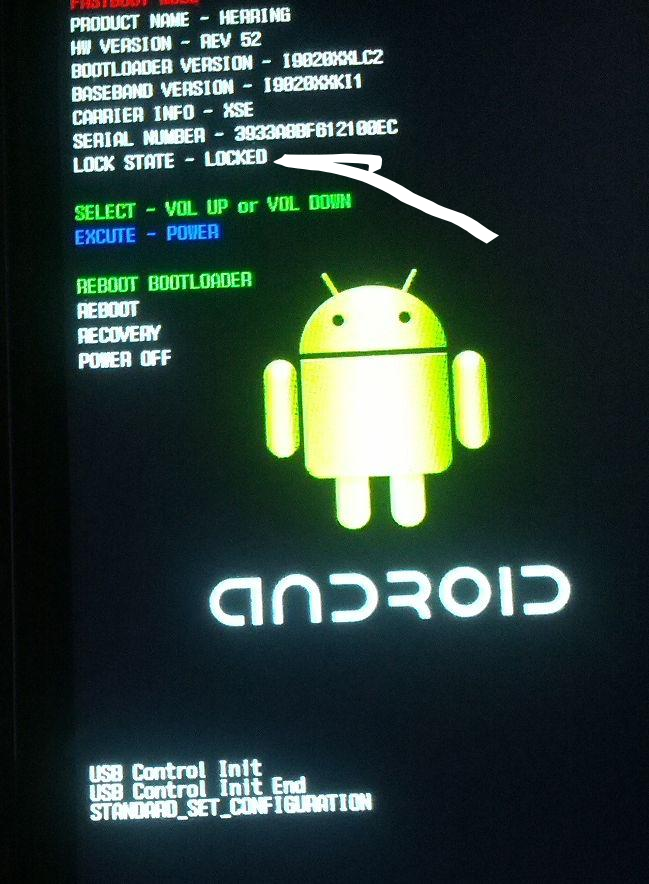
Here is one for an Android device. But don't forget, under the skin, we're all androids!


Of course, mine didn't have a cute little Android or some of the extra device information, but it did have some similar stuff. The point is that you don't want to pick options from this screen, you just want to be on this screen with your phone. Once your phone displays this screen, you can run those mysterious fastboot commands from the command prompt on your PC. The instructions on how to do all this from a Mac or Linux are around, but in keeping with my lazy ways, I went with what was close at hand. I have now put Fedora on two spare netbooks and I'll try building my own images at some point. But for now, my Peak works and I'm back to game programming.

Next up, a series of posts on creating your own version of Flappy Bird, maybe some ASCII art games, a text adventure, a cool RPG, some platformers, oh, and maybe I'll pull these posts together and make a book!