Showing posts with label Construct 2. Show all posts

Tuesday, October 7, 2014

Sprite Sheets in Construct 2

I spent a few months traveling and not doing much of anything useful to anyone else, but I had a good time!

I did manage to review a book on Construct 2 that will help people make apps for Firefox OS. Especially for games, Construct 2 is a fast drag and drop game engine that thinks in HTML5! In case you missed it, my review of Construct 2 Game Development by Example is at http://firefoxosgaming.blogspot.com/2014/09/construct-2-game-development-by-example.html.

I'll also get back to reviewing games for Firefox OS, so if you know of any games in the Firefox OS Marketplace that you'd like me to review, let me know!

Efficient Artwork

The last real programming post I did was on how to do a platform game in Construct 2 for Firefox OS. You can read it here at http://firefoxosgaming.blogspot.com/2014/06/platform-game-using-construct-2-game.html. Essentially the game worked, but over on the Construct 2 site, a person named Aphrodite (from France) pointed out that it is somewhat inefficient to load in individual pieces of art for each block on the screen.

Here's what the game looks like:


The blue hero is standing on a platform made up of lemon lollypops (minus the stick). Each lollypop is a sprite. Sprites are an easy way to create patterns on the screen. The same sprite can be reused throughout your game, saving on memory. But loading sprites one at at time (which is what I did) isn't the best way.

But here's a better way to create objects on the screen.

Step 1 - Start a new project.

Download the latest Construct 2 which you can always get from www.scirra.com. Open up Construct 2 and open up a new project. Use the New Empty Project template.

Why do you want the latest? Construct 2 is trying to match every browser, and every browser is updating madly. So keep up!

Step 2 - Set up Grid and Snap

Up near the top is a View tab. Open it up and find Snap to grid. Click the box to make snapping happen. For grid-based platformers and role-playing games, grids are great and snapping makes sure that all the squares line up! Also set the grid width to what will match the pieces. In this case the squares are 32x32 pixels.

You can also click the box next to Show grid. I like this so I can see the grid. You can always turn it off it you want to get the feel of the game after you've assembled the pieces.

Step 3 - Find a Sprite Sheet

Sprite sheets are wonderful. Instead of loading each little sprite image separately, you can load one bitmap which contains all the sprites you want to use. Here's a great one from the artist I used last time, Kenney. You can get his free art at http://kenney.nl/.

If you look closely, you can see that he's created 49 sprites and placed them in a 7x7 grid. Thank you, Kenney!

Step 4 - Pull the Sprite Sheet into Construct

The next step is tricky. Make sure you are looking at a Layout screen. Double-click anywhere on the screen. You'll bring up the Insert New Object screen. Double-click on the Sprite object. The Insert New Object screen disappears and you're left with a cursor that has a target shape. Click anywhere on the Layout screen to start the Sprite Sheet process.

Essentially the process is:

  1. Double-click on the Layout screen.
  2. Double-click on the Sprite object.
  3. Single-click on the Layout.

This will place an object where you click, but you can easily move it later.

When you do that, you get the Edit Image editor. This editor consists of three separate screens. The main screen looks like this:


This screen is where you can manipulate art and do lots of cool things.

But there are two other screens that are useful for sprite sheets.

Usually to the right of the main edit screen is the Animations screen. It looks like this:


And finally, the Animation Frames screen, which is usually below the main screen and looks like this:


Construct 2 has an elaborate animation system that can let you do all kinds of cool things with animated characters, but it also uses its animation system to place pieces of a sprite sheet by treating each sprite as an animation frame. Very interesting!

So now that you know these three screens and you've brought up the editor, it's time to load the sprite sheet.

Right-click on the Animation frames screen and select Import frames and then From sprite strip....


Construct 2 will load the sprite sheet and attempt to figure out how the sprites are arranged. Sometimes it does and sometimes it doesn't. In my case it didn't. I just got this:


Well, no problem. Just tell Construct 2 how the sprites are laid out inside the sprite sheet. I inserted 7 into the horizontal cells and 7 into the vertical cells. I said OK.

When I do that, the sprites are arranged into 49 numbered parts.  Here is what it now looks like in the Animation frames screen:


Right-click on the first sprite (blank) and delete it. Your sprites are now numbered 1-49. We need to do two more steps before we are ready to blast Kenney's sprites onto the Layout.

Step 5 - Remove White Space

If you look very carefully, you'll see that Kenney left a tiny bit of space between each sprite. You need to remove this so the sprites join up perfectly with no gaps. Other sprite sheets have the sprites flush, but we've got Kenney and the price is right - free!

Luckily for us all, Construct 2 thought of this and has a way to automatically remove all the white space. Here's what you do.

Go to the main Image editor window. You should see something like this, with the first sprite in the center.


Near the upper-middle you'll see a button that looks like a little target. Counting from the right, it's the sixth one over. Hover over it and it will say Crop transparent edges. Hold shift to crop all of the 49 images. After a minute, the extra white space is gone.

There's a lot of smarts behind Construct 2, which is why it is cooler than any other game engine. But there's one more prep step to go!

Step 6 - Resize the Sprites

Kenney's sprites are 74x74 pixels. Why? Who knows. Maybe it's because he's from the Netherlands. Doesn't matter. We want our sprites to be 32x32.

Once again, Construct 2 to the rescue. Right to the left of the button that you used to remove extra white space is the Resize button. Click on it and you'll get a little window.


You want to make some changes. The first change is to put 32 for the Width (pixels) and 32 for the Height (pixels). Then click the box to Apply to whole animation. And keep the Stretch Image choice the same.

When you press okay, there will be a pause and the sprites will all shrink to 32x32!

Step 7 - Place the Sprite Objects

I covered this part in the last tutorial. Essentially you just close the editor to place your first sprite object.

You can click and drag on it, taking advantage of the grid. This is image#0, but you might get bored with that later.

You can copy a sprite object by just clicking on it, pressing control, and then dragging it. You'll be dragging a copy and when you let go, you have a new copy of the sprite. It is still image#0, but you can change that.

If you click on the sprite object, over to the left, you'll see the properties of the sprite object.

You'll see that the initial frame is 0, but you can choose from any of the 49 images. Let's make it 11, which is a cherry!

If you can't remember what frames correspond to which images, just double click on an object on the screen and the Edit Image windows will come up. You might want to even print them out so you can make really cool worlds by combining the individual sprites.

Next

I'll be getting back to reviewing some Firefox OS games from the Marketplace, working a bit more to improve some code I wrote for the same tutorial as I improved just now, checking to see if the Firefox OS build process has changes, seeing if I can upgrade my phones, and beginning to work on a real role-playing and/or puzzle game.

I've done enough with Construct 2 for now and I'm eager to get back to native HTMl5. Especially the siren song of SVG, and the cool things that only it can do in a web page. 

Until then, stay tuned but not iTuned!

Friday, June 13, 2014

Platform Game using Construct 2 (Game Programming)

While most of my posts have been about creating Firefox OS games from scratch, I am finding it fun and interesting to use Construct 2 for game making. You just drag and drop, set a few values, and things magically happen. What is especially nice is that Scirra (the makers of Construct 2) has gone to the trouble to allow you to create the game and export it directly to a form that works perfectly with Firefox OS. They refer to it as an "Open Web App" but the icon is for the Firefox OS Marketplace. They also export to 14 other formats! And everything in Construct 2 is based on HTML5, which makes for great compatibility with Firefox OS!

I wrote two earlier posts about using Construct 2. One on bouncing a ball at http://firefoxosgaming.blogspot.com/2014/04/bouncing-ball-in-construct-2-game.html and the other on a simple paddle game I wrote called PaddleFox at http://firefoxosgaming.blogspot.com/2014/05/paddlefox-for-firefox-os-in-construct-2.html.

Today's game is called Alien Candy Platformer and uses the absolutely cool art by Kenney, who makes cool art and gives it away. I missed out on the Candy Jam, but this would have been my entry! Here's some art by Kenney.


You can find out more about Kenney and his cool art at http://www.kenney.nl/ and tweet him at @KenneyWings. Thank you, Kenney, I love your art! You can make a donation to him and get 6000 bits of art. How cool is that?

Game Design

The purpose of this game is to have an alien that jumps around and tries to land on various platforms. If the alien misses and falls to the ground, he dies. If he can get to the end and grab a cherry, he wins!

But we're going to do this for a phone and I'm going to do something different for the controls. In the original designs, platformers had buttons you pressed to jump and other controls to move left or right. Controlling the jumps is very critical.

But a phone doesn't have buttons, joysticks, or directional controllers. Most phone games attempt to emulate those controls on screen by having shapes that you touch and/or drag. Personally, I don't like that because I have to be too aware of exactly where I am touching and dragging.

So I've come up with a design that I haven't seen anywhere and might be good for platformers. Here are the rules for touching:

  1. Tap below the hero to move him right or left. Tap below and right to move right, tap below and left to move left, in small increments.
  2. Tap above the hero to have him jump up and left or right. Tap above and to the right to have him jump up and to the right. Tap above and to the left to have him jump up and to the left.
These two rules let you keep your eye on the character. You can tap anywhere above, below, left or right. Precise movement on a phone isn't really a good idea, because your fingers are much wider than one pixel!

The game will be set up so the phone is in portrait mode. You see the game world through a phone-sized window but the world is larger. As you move and jump, the world scrolls so that the view window is always centered on the hero.

Setting Up

Get the latest version of Construct 2 at http://www.scirra.com. They update frequently and always have two versions: stable and beta. Go with "stable" and you'll be safe!

So first you want to set up the size of your "window" which is what the player will see. In the project properties window, set Window Size to 320x448. I picked this size so it will fit on my ZTE Open C, but because Construct 2 will scale things, this will work well on different sized phones. I haven't had a chance to test this on my new tablet yet, but I will soon and report back.

Here is the properties window for the game:


Change the details in the About section, of course, and sizes are entirely up to you. Scirra has very good documentation on all the values for the various windows. The point of a this is that instead of writing code, you just fill in the blanks and the brilliant programmers at Scirra take care of the details. Most of the time you can go with the default values. Easy!

Next I want to create a layout, which is the world the game takes place in. I made the size 1920x448, which is  the same height as the game window, but is six times the width. I picked these values arbitrarily. That felt right for one demo. Enough to give you the idea, but simple enough to do in a few minutes.

Here's my layout window properties:


Objects

Now that the game window and the world layout are set up, it's time to add objects to the game.

The Hero Alien

The first object to add is the hero. I used art from Kenney and I wanted to show simple animation. Nothing elaborate, just a two-step animation that shows the character's legs moving. But it adds a lot of the flavor of the game and is very easy to do.

Right-click on the Object Types node in the Projects window. Select Sprite. Click on the location on the layout you want the hero to appear. You'll see three little screens (Edit Image, Animation Frames, and Animations.

We want to load two images that will cycle back and forth. To load the first image, click on the load image icon (looks like an open folder) in the image editor and get your first of two images. You should see it on the main image editor.


Close the image editor and open it again by double-clicking on the sprite you just placed on the screen. Now you should see a smaller version on the Animation Frames window.


Next, right click to the immediate right of the little image in the Animation frames window and select a second image with Add frame. 

You should now see this screen.


If you look closely, you'll see that the legs are open on the first one and closed on the second. When viewed in rapid succession, they form an animation.

There is an animation properties window. Make it look like this:


This sets the loop speed and where the loop starts.

I resized the alien pictures to 32x32 which fits the grid I set in the View section at the very top. Having a grid really helps with laying out stuff

Next we need to add behaviors to our hero. Right-click on the hero (I named him "Alien") and select Behaviors. The first behavior is to give him Platform behavior. This creates a set of defaults that work well for a platform game. The manual says "The Platform behavior implements a side-view 'jump and run' style movement. It supports slopes, moving platforms, 'jump-thru' platforms, and arbitrary angles of gravity."

The second behavior is called ScrollTo and will simply make the camera follow the character.

Here are the behaviors of the hero (Alien).


Here are the properties of the hero.


Under the Behaviors - Platform section, I changed the numbers somewhat to make it work the way I wanted to have the jumps. Luckily for us, there is excellent help and you can read all about the Platform variables.

The Alien is now ready to go, but if you start the game, he'll just fall to the ground and disappear!

We need some platforms for him to jump on.

The Platforms

 Kenney to the rescue again, with some cool candy art that I used for platforms. This time we're going to use animations a different way by importing a bunch of tiles and then painting them on the screen. Sounds weird but it works.

Create a new object like before, but this time instead start with the Animation frame window and right click to the right of the blank square. Navigate to a set of sprites. I picked the Candy Expansion from Kenney, which is 95 squares that can be combined to make candy shapes. Go to the folder with the candy and select all the sprites at once and load them in.

Your Animation frame window should look like this:


You'll see 95 tiles, each with a number. You'll need those numbers soon!

By the way, here's a snapshot of the whole tile set.


Games often use tile sets to create complex images. This saves memory because you only need to load in one set of images, but you can copy them to make elaborate kinds of art, as we shall soon see.

The first tile will be blank, so delete it. Then resize the image from the Image Editor so that the tile is 32x32. Now you are almost ready to start painting with candy!

But first you want the candy bits to have a behavior. This one is simple. Make it Solid. That way the alien won't fall through it. You want the alien to jump from one platform to another.

Now to the painting. You have a 32x32 tile. Click on it. You'll see the properties for this first candy sprite.

The important variable here is Initial frame. I set it to 42, which is the 42nd image in the sprite pack. That's the left side of what looks like a pie. For reference, here are four images that make up a pie.


The one on the left is 42. The two middles are 30, and the one on the right is 44. You can refer to the numbers by going back to the Animation frame screen in the Image Editor.

How do I get the other bits of the pie? The cool part is that you select the first image, hold down the control key, and drag. When you have 4 tiles adjacent to each other, select each one and change the Initial frame number. If you want to start a new pie, just hold down the control key and drag the piece anywhere and then drop it and then click on it.

Here are some of the platforms I created for this game.


So spend a few minutes putting up platforms and making them so they can be jumped to. You'll want to move them around later. You can move a set by selecting all four and dragging the set. Because you set the View properties to Snap to Grid, it will be easy to place things.

Next you want one more object.

The Prize

I selected a cherry from the candy set as the prize. If the alien can touch this, he wins!

Insert an object and make the image a cherry. No behaviors are needed. The hero just has to touch it!

Here's the cherry.


The cherry is surrounded by some other platform pieces. You'll want to jump from the pie on the left and the yellow lollypops under it are where you'll want to land safely!

So we now have our game pieces set up, but we need to add some simple events to allow the action to take place.

Events

This is the closest you get to programming in Construct 2, where you pick events that may happen and actions you want to take place when those events occur.

There are four mouse events and two alien events.

Mouse Events

To make things simple, you can use a mouse event and Firefox OS will interpret it as a touch event on the screen. How convenient!

First you must actually add a Mouse object to your set of objects. It doesn't have any special behaviors, you just add it.

All the objects are in place and you have given them names. Here's my list of objects.


Next, you can start adding the events. Select the event sheet and click on Add event (faintly seen at the top). As outlined at the beginning, we want two types of events: tapping (clicking) above and below.

Here is the first event (on the left) and the action you want to happen (on the right).


Start with the Mouse event and select the On Left button Clicked. Then below it, add two system events. The first system event checks to see where the click is on the screen relative to the alien. We are looking at X values. If the Alien.X is greater than the Mouse.X, that means the mouse was clicked to the left of the alien. X is left-right. Then a second check is made to compare the Y values. If the alien Y is greater than the Mouse Y, that means that the click is above the alien. The coordinate system is set up so that 0,0 is at the upper left hand corner. So if the mouse's Y value is smaller than the alien's Y value, that means that the mouse is above the alien!

Taking these three events together, you then set up actions. The first action is that character jumps. The details of the jump are in the hero's properties (above). You can vary how much the character jumps, how fast it falls, etc. The second action determines the direction the hero jumps. It sets the X vector (speed and direction) to -600 pixels of the hero. Which means it jumps to the left. So a tap above the hero and anywhere to the left will make the character jump left.

The event is the same as the first, but jumps to the right if the mouse click is above and to the right.


The same logic, but this time the click is above and to the right and the character jumps up and right.

The two next events are similar, but look to see if the mouse clicks are below the character. I wanted to do this so the character can carefully move on the platform before jumping. I haven't seen this type of motion anywhere but I'm trying to create something original for touch screens, not just emulate old Arcade and Console buttons. Here's the events for moving left or right but not jumping.


Again, the events are similar, but this time you are looking to see if the click is below the hero. If it is, you then see is the click to the right or left of the hero. Depending on that, you move the hero 20 pixels left or right. Angle 0 is to the right, angle 180 is to the left.

Alien Events

You want to add two simple events that look to see where the alien is. You're moving and jumping him around, but you want to see if he does certain things, you want to take specific actions.

Here are the two alien events:


The first simply tests to see if the alien is outside of the 1920x488 layout. If so, this means he fell down off a platform (or possibly jumped too high, or went off the right or left edges). This means the alien has failed. To make things simple, I just simply turn the screen red. rgb(255,0,0) is red!

The second is a test to see if the Alien is overlapping the Cherry. If this happens, the Alien wins and the screen turns green.

And that concludes the game. Once you understand the basics of Construct 2, you can see that the game is all about putting in the art, specifying what you want to happen, and you can begin playing.

Exporting to Firefox OS

You can just run the game at any time in the Firefox browser, which makes it easy to test.


The character is sitting on a pie, ready to jump up to the next platform. Testing in Firefox makes it easy to tweak the game.

Once you are ready, just choose Export project from Construct 2's file menu and Choose Open Web App. You can pick the folder and choose whether to minify or not. I don't like Java, so I don't, but maybe I will later. You then select Packaged App (unless you want to put it on a server) and enable Storage and Geolocation if you want.

The app is now ready. It even has a manifest file set up for you. The only change you need to make is to substitute your own 5 icons for the ones that Scirra generates. I wrote about how to submit to the Firefox OS Marketplace at http://firefoxosgaming.blogspot.com/2014/01/submitting-app-game-programming.html.

So now you can make cool platformers and put them in the marketplace with Construct 2.

Here are a few screenshots of my game.

The Game

Here's our little alien, starting out.


He can jump to the right or the left. This game has a left-to-right progression. Why? Ask Mario!


Jump higher or drop down? Or go back? You decide!


Either way, he got to the next platform.

Oh, no, he failed the jump!


Start over and try again ...


He goes for the cherry and ...


He wins! The alien wins!

You can play the game from here: http://thulfram.com/1GAM/May%202014/ACP/index.html. But be sure to use the Firefox browser!

So that's it for now. Stay tuned, but not iTuned!

Thursday, May 1, 2014

PaddleFox for Firefox OS in Construct 2 (Game Programming)

The more I use Construct 2 (from Scirrra at http://www.scirra.com), the more I am convinced that Scirra and Firefox OS make a great team-up for HTML5. I especially like how Scirra has made it really easy to make a game AND put it in the Firefox OS Marketplace.

But first, go back and read my recent post on using Construct 2 to bounce a ball. http://firefoxosgaming.blogspot.com/2014/04/bouncing-ball-in-construct-2-game.html. I've written several posts on bouncing balls, showing six different ways to do it with CSS, Canvas, and SVG. But now there's a seventh way, and a very easy way, to do it with Construct 2.

Compare the 154 lines of "simple" HTML5 CSS code to bounce a ball in my latest CSS shell post at http://firefoxosgaming.blogspot.com/2014/03/son-of-css-shell-game-programming.html. Now compare that with the roughly 20 steps for doing the same thing in Construct 2. But those 20 steps are all about picking from lists, filling in blanks, and not worrying about missing a semicolon! And we won't even talk about how hard it would be to write the same code in Java for Android or Objectionable-C for iPhone!!!

Today's post is about taking that boring bouncing ball and turning it into a simple game. Why not try PaddleFox?


This is the game that I wrote and placed in the Firefox OS Marketplace. You can get it there at https://marketplace.firefox.com/app/paddlefox and you can read how I created it at http://firefoxosgaming.blogspot.com/2014/01/paddlefox-game-programming.html

PaddleFox is 268 lines of juicy HTML5 goodness made possible by using SVG (in its most delicious form, the direct SVG DOM) with a little bit of CSS thrown in for good luck. But no Canvas. Ugh. I hate Canvas. (Well, not really, but I really like the object-oriented retained-mode SVG much better!)

So, how would I do this in Construct 2. Well, the answer is ... I did it extremely easily. I already had a bouncing ball. All I had to do was add a paddle! 

So let's begin where we were with the bouncing ball. Here's Construct 2 with the ball in place.


The first thing to do is create a paddle. Double-click on the board (Layout 1) and add a Sprite. Click where you want it to go on the board. You'll get the Edit Image dialog. But instead of loading an image, let's do something simpler. We'll make a sprite out of thin air. 

First pick a color for the sprite by clicking on the paint bucket on the left. The color picker will come up. Pick a color. 

I picked blue! That's RGB(0,0,255) if you're curious. But because this is Construct 2, all you need to know is blue, you don't need to care about all those messy numbers!

Then once you've picked your color, click on the square in the middle of the Edit Image dialog. It will turn blue (or whatever color you picked). 

Next, grab the edges of the blue square and resize it so it looks like a paddle. Here's what I did:


Kill the Edit Image dialog and modify your new paddle. Notice that you didn't need art because you were making a rectangle. Dull, but good enough for now. Your paddle is sitting on the board now, keeping the ball company. 

But let's go to the paddle properties and make sure your paddle is a good paddle.


I made the paddle 128 x 32 pixels and gave it a position at 160,400. This makes it fit on the grid nicely. It could be anywhere as long as its near the bottom, but I thought it might be helpful to have everything on a simple 32x32 grid. 

Next I wanted to give the paddle some behaviors. You'll see this a lot. 

  1. Create an object.
  2. Position it on the board.
  3. Give it behaviors.

That makes it a real object with form, position, and ... behavior. Well, what kind of behavior should a paddle have? (And I keep hearing Austin Powers saying, "Oh, behave!"

Click on Behaviors in the Properties window.


I gave it just two simple behaviors. 

  1. Solid. It is good to be solid. That way balls can bounce off it.
  2. Bound to Layout. This keeps the paddle from going off either side.

The second behavior would take complicated code in HTML5, calculating the edge value and making sure you don't go beyond it. But Construct 2 does this for you with one quick choice.

Also, give the paddle a name. Go over to the Projects window and rename the new object something like "Paddle" so you can come back to it later. Naming is always a good idea!

The paddle is ready. But how do you move it? In HTML5 you'd set up an event handler and process it when the mouse (or finger) does something. In the HTML5 version of PaddleFox, I calculated where the mouse click was and if it was on the left side, I moved the paddle left, and right, right. Firefox OS will interpret a touch on the screen as a mouse click, by the way, and Construct 2's mouse clicks are interpreted the same way.

So I want some way to interpret clicks. After thinking about it, and wanting it to be easy and as calculation-free as possible, I came up with this solution. You may have another. 

What I did was to have two invisible objects, one of the left, the other on the right, and do something when you click on them. 

To make things easy, the first step of doing this is to create a new layer. In the free version of Construct 2, you're limited to 4 layers and 100 events (we'll see events in a minute). But we only need two layers here. The first you've already been using, and the second will now appear. Layers are an easy way to keep objects separate and also serve as a series of planes so that the top layer is what you see first and lower layers may be obscured by objects on the top. Also, layers can be temporarily turned off so you can work on complicated stuff, on layer at a time. You can read about layers in the Construct 2 manual at https://www.scirra.com/manual/85/layers

Layers are under the Projects window. There's a tab at the bottom of that window that says Layers. Click on it to see the current layers. 


Click on the + (plus) button to create a new layer. I called my new layer Layer 1 but you can call it anything you want.

After you do that, you'll have two layers to play with:


Layer 0 was the earlier layer and is "behind" Layer 1. Notice that I've unchecked Layer 0 right now because I don't want to see the ball and paddle.

I want to add an invisible object that will cover the left side of the screen. So the first step is to create a new object. Just double click on the board and like you did with the paddle. You don't want any art and you don't want any fill. Once you've got your new object, kill it. 

You've got a new object on the screen. Stretch it to cover the whole board so it looks like this:


Next, drag the right edge over to the middle so it looks like this:


When using invisible objects like this which will be used for what is called "hit testing" you can overlap the edges, but you'll want to keep the right edge of this left object flush with the center so you don't have a confusion if the user taps near the center. 

Rename this object something like LeftTouch. You can check the values with the Properties window:

Note that Opacity for 100 means solid, so you should see it. But you don't because there isn't a picture or color there. An interesting quirk. If you added a color, you could make it zero opacity so it was invisible and then when you touch it, you could make it 100% opaque for a second so the user know they touched something. But I'm trying to be simple here.

Do the same procedure for a right invisible object covering the right side of the board on Layer 1. Name it something clever like RightTouch.

Next you need to add Mouse functionality. Do this by going to the Projects window (push Layers out of the way) and right-click on Object types and select Mouse. 

Now you are ready for the mysterious world of Events. You've had the Layout tab selected all this time so you could see the board. Up at the top but before the ribbon you'll see a few tabs. Click on Event Sheet 1. It will be blank.

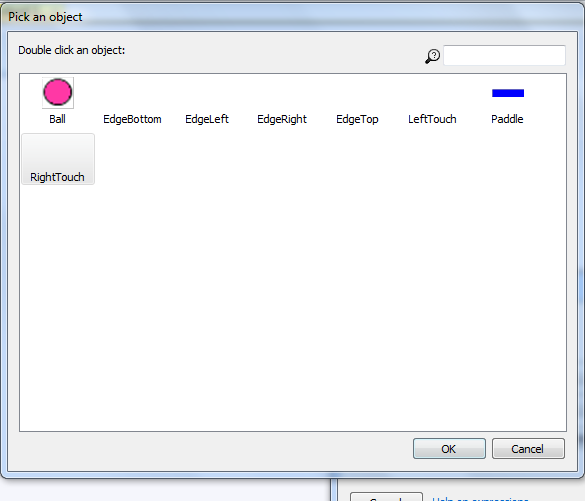
To add your first event, double-click on the Event Sheet. You'll be asked to select an object.


This will match the objects you have added to the project. Double-click on the Mouse object.


These are the events that the mouse can respond to. Pick "On object clicked". You'll get this dialog:


This asks you which object you want to see if it was clicked. Pick one of the hit target objects we just created.


Then choose the values you see above for the RightTouch object. You want to detect the left mouse button, you want to detect a click, and you want it to be the RightTouch object. Click Done and you are done. Except you want to do the same thing for the LeftTouch object. Your event sheet will now look something like this:

This tells you that the LeftTouch and RightTouch objects are ready to be clicked on by the mouse's left button.

But what happens? You've got the events, but nothing will happen. You need to supply Actions!

Actions are needed for an event. Think of them as event handlers. An event takes place, like a mouse button click, but you need an action to then take place. To the immediate right of an event you'll find the words Add action

You'll get a list of object to pick from. Pick the paddle. You want action on that paddle. 


The action you want to choose is "Move at Angle". Notice that you see a little picture of the paddle to remind you that you're moving the paddle.  

When you choose that action, you then need to tell Construct 2 what angle:


The angle is 0. For Construct 2, zero degrees is straight right. So this is for the RightTouch object and the distance you want it to travel is 16 pixels. Every time you click on the RightTouch object (representing the right side of the screen) the paddle will move 16 pixels right until it hits the edge and then it will not go further.

Do the same for the LeftTouch object, but make the Angle 180,  and you're set for the paddle!

Your Event Sheet should look like this:


This tells you what events will be processed and what action will happen. This is really nice because you can tell what will happen.

Click on the big arrow at the top of Construct 2 and you can watch the ball bounce around. Click on either side of the screen and see the paddle move. Cool!

And the ball bounces off the paddle. Amazing. But ... there are two more things that would be nice to add that would make it a real game.

  1. Have it so that if you miss with the paddle, and the ball hits the bottom edge, the game is over.
  2. Notify the user that the game is over!
  3. Stop the ball from moving.

And this is really easy with Construct 2. We'll do it by displaying a message saying that the game is over and stop the ball.

To do this, we need to add a Text object. Go to the Projects window and right-click on Object types and choose a Text object. Place it on the Layout screen where you want the text to be displayed. Somewhere near the top.

Check out the Text object Properties:


The important property here is to make the Initial visibility to Invisible. You don't want this text to display until the game is over. And now to set that up.

We need to add one more event. We want to see what will happen is the ball hits the bottom edge. As you may recall, in the bouncing ball example in my earlier post on Construct 2, each of the four edges is an invisible box that is just a line. I called mine EdgeBottom.

Double-click on the Event Sheet and select Ball. You'll get this:


You are interested in Collisions and in particular, "On collision with another object". Select that and click on Next. 


Construct 2 wants to know what object you want to collide with. How about EdgeBottom?


Click on Done to end your Event. But now you must select an Action to go with that Event.

Click on Add action and choose the Text object. Then select "Set Visible" and make the visibility "Visible".

Next do the same thing and add a second action and then choose Text and this time select "Set Text" and give it the value "Game Over!"

Finally, to stop the ball, add a third Action for the ball. Under Bullet, select "Set Speed" and give it the value zero. Your ball will stop.

Here's what your Event sheet should look like:


That's it. You're done! Just press the big arrow at the top and run the game. You can export it and choose "Open Web App" which is the name of the Firefox OS Marketplace. If you want to put it in the Marketplace, just make sure you change the icons from Construct 2 to your own icons and that all your information applies to you, not to me or Construct 2 defaults.

This is just so cool! Now anyone can make a game for Construct 2.

Here is what the results looks like for Firefox OS:


And here is what it looks like when the game is over!


If you want to download a copy to run in Construct 2, you can get it at http://thulfram.com/1GAM/April%202014/PaddleFoxC2.capx

I'll be playing around with Construct 2 for the next few weeks, finding out other cool things it does and how to transfer those cool things to Firefox OS.

Stay tuned, but not iTuned!