Showing posts with label PaddleFox. Show all posts

Thursday, May 1, 2014

PaddleFox for Firefox OS in Construct 2 (Game Programming)

The more I use Construct 2 (from Scirrra at http://www.scirra.com), the more I am convinced that Scirra and Firefox OS make a great team-up for HTML5. I especially like how Scirra has made it really easy to make a game AND put it in the Firefox OS Marketplace.

But first, go back and read my recent post on using Construct 2 to bounce a ball. http://firefoxosgaming.blogspot.com/2014/04/bouncing-ball-in-construct-2-game.html. I've written several posts on bouncing balls, showing six different ways to do it with CSS, Canvas, and SVG. But now there's a seventh way, and a very easy way, to do it with Construct 2.

Compare the 154 lines of "simple" HTML5 CSS code to bounce a ball in my latest CSS shell post at http://firefoxosgaming.blogspot.com/2014/03/son-of-css-shell-game-programming.html. Now compare that with the roughly 20 steps for doing the same thing in Construct 2. But those 20 steps are all about picking from lists, filling in blanks, and not worrying about missing a semicolon! And we won't even talk about how hard it would be to write the same code in Java for Android or Objectionable-C for iPhone!!!

Today's post is about taking that boring bouncing ball and turning it into a simple game. Why not try PaddleFox?


This is the game that I wrote and placed in the Firefox OS Marketplace. You can get it there at https://marketplace.firefox.com/app/paddlefox and you can read how I created it at http://firefoxosgaming.blogspot.com/2014/01/paddlefox-game-programming.html

PaddleFox is 268 lines of juicy HTML5 goodness made possible by using SVG (in its most delicious form, the direct SVG DOM) with a little bit of CSS thrown in for good luck. But no Canvas. Ugh. I hate Canvas. (Well, not really, but I really like the object-oriented retained-mode SVG much better!)

So, how would I do this in Construct 2. Well, the answer is ... I did it extremely easily. I already had a bouncing ball. All I had to do was add a paddle! 

So let's begin where we were with the bouncing ball. Here's Construct 2 with the ball in place.


The first thing to do is create a paddle. Double-click on the board (Layout 1) and add a Sprite. Click where you want it to go on the board. You'll get the Edit Image dialog. But instead of loading an image, let's do something simpler. We'll make a sprite out of thin air. 

First pick a color for the sprite by clicking on the paint bucket on the left. The color picker will come up. Pick a color. 

I picked blue! That's RGB(0,0,255) if you're curious. But because this is Construct 2, all you need to know is blue, you don't need to care about all those messy numbers!

Then once you've picked your color, click on the square in the middle of the Edit Image dialog. It will turn blue (or whatever color you picked). 

Next, grab the edges of the blue square and resize it so it looks like a paddle. Here's what I did:


Kill the Edit Image dialog and modify your new paddle. Notice that you didn't need art because you were making a rectangle. Dull, but good enough for now. Your paddle is sitting on the board now, keeping the ball company. 

But let's go to the paddle properties and make sure your paddle is a good paddle.


I made the paddle 128 x 32 pixels and gave it a position at 160,400. This makes it fit on the grid nicely. It could be anywhere as long as its near the bottom, but I thought it might be helpful to have everything on a simple 32x32 grid. 

Next I wanted to give the paddle some behaviors. You'll see this a lot. 

  1. Create an object.
  2. Position it on the board.
  3. Give it behaviors.

That makes it a real object with form, position, and ... behavior. Well, what kind of behavior should a paddle have? (And I keep hearing Austin Powers saying, "Oh, behave!"

Click on Behaviors in the Properties window.


I gave it just two simple behaviors. 

  1. Solid. It is good to be solid. That way balls can bounce off it.
  2. Bound to Layout. This keeps the paddle from going off either side.

The second behavior would take complicated code in HTML5, calculating the edge value and making sure you don't go beyond it. But Construct 2 does this for you with one quick choice.

Also, give the paddle a name. Go over to the Projects window and rename the new object something like "Paddle" so you can come back to it later. Naming is always a good idea!

The paddle is ready. But how do you move it? In HTML5 you'd set up an event handler and process it when the mouse (or finger) does something. In the HTML5 version of PaddleFox, I calculated where the mouse click was and if it was on the left side, I moved the paddle left, and right, right. Firefox OS will interpret a touch on the screen as a mouse click, by the way, and Construct 2's mouse clicks are interpreted the same way.

So I want some way to interpret clicks. After thinking about it, and wanting it to be easy and as calculation-free as possible, I came up with this solution. You may have another. 

What I did was to have two invisible objects, one of the left, the other on the right, and do something when you click on them. 

To make things easy, the first step of doing this is to create a new layer. In the free version of Construct 2, you're limited to 4 layers and 100 events (we'll see events in a minute). But we only need two layers here. The first you've already been using, and the second will now appear. Layers are an easy way to keep objects separate and also serve as a series of planes so that the top layer is what you see first and lower layers may be obscured by objects on the top. Also, layers can be temporarily turned off so you can work on complicated stuff, on layer at a time. You can read about layers in the Construct 2 manual at https://www.scirra.com/manual/85/layers

Layers are under the Projects window. There's a tab at the bottom of that window that says Layers. Click on it to see the current layers. 


Click on the + (plus) button to create a new layer. I called my new layer Layer 1 but you can call it anything you want.

After you do that, you'll have two layers to play with:


Layer 0 was the earlier layer and is "behind" Layer 1. Notice that I've unchecked Layer 0 right now because I don't want to see the ball and paddle.

I want to add an invisible object that will cover the left side of the screen. So the first step is to create a new object. Just double click on the board and like you did with the paddle. You don't want any art and you don't want any fill. Once you've got your new object, kill it. 

You've got a new object on the screen. Stretch it to cover the whole board so it looks like this:


Next, drag the right edge over to the middle so it looks like this:


When using invisible objects like this which will be used for what is called "hit testing" you can overlap the edges, but you'll want to keep the right edge of this left object flush with the center so you don't have a confusion if the user taps near the center. 

Rename this object something like LeftTouch. You can check the values with the Properties window:

Note that Opacity for 100 means solid, so you should see it. But you don't because there isn't a picture or color there. An interesting quirk. If you added a color, you could make it zero opacity so it was invisible and then when you touch it, you could make it 100% opaque for a second so the user know they touched something. But I'm trying to be simple here.

Do the same procedure for a right invisible object covering the right side of the board on Layer 1. Name it something clever like RightTouch.

Next you need to add Mouse functionality. Do this by going to the Projects window (push Layers out of the way) and right-click on Object types and select Mouse. 

Now you are ready for the mysterious world of Events. You've had the Layout tab selected all this time so you could see the board. Up at the top but before the ribbon you'll see a few tabs. Click on Event Sheet 1. It will be blank.

To add your first event, double-click on the Event Sheet. You'll be asked to select an object.


This will match the objects you have added to the project. Double-click on the Mouse object.


These are the events that the mouse can respond to. Pick "On object clicked". You'll get this dialog:
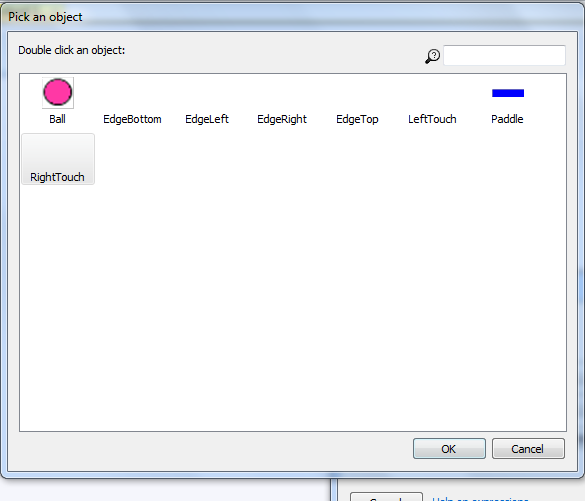

This asks you which object you want to see if it was clicked. Pick one of the hit target objects we just created.


Then choose the values you see above for the RightTouch object. You want to detect the left mouse button, you want to detect a click, and you want it to be the RightTouch object. Click Done and you are done. Except you want to do the same thing for the LeftTouch object. Your event sheet will now look something like this:

This tells you that the LeftTouch and RightTouch objects are ready to be clicked on by the mouse's left button.

But what happens? You've got the events, but nothing will happen. You need to supply Actions!

Actions are needed for an event. Think of them as event handlers. An event takes place, like a mouse button click, but you need an action to then take place. To the immediate right of an event you'll find the words Add action

You'll get a list of object to pick from. Pick the paddle. You want action on that paddle. 


The action you want to choose is "Move at Angle". Notice that you see a little picture of the paddle to remind you that you're moving the paddle.  

When you choose that action, you then need to tell Construct 2 what angle:


The angle is 0. For Construct 2, zero degrees is straight right. So this is for the RightTouch object and the distance you want it to travel is 16 pixels. Every time you click on the RightTouch object (representing the right side of the screen) the paddle will move 16 pixels right until it hits the edge and then it will not go further.

Do the same for the LeftTouch object, but make the Angle 180,  and you're set for the paddle!

Your Event Sheet should look like this:


This tells you what events will be processed and what action will happen. This is really nice because you can tell what will happen.

Click on the big arrow at the top of Construct 2 and you can watch the ball bounce around. Click on either side of the screen and see the paddle move. Cool!

And the ball bounces off the paddle. Amazing. But ... there are two more things that would be nice to add that would make it a real game.

  1. Have it so that if you miss with the paddle, and the ball hits the bottom edge, the game is over.
  2. Notify the user that the game is over!
  3. Stop the ball from moving.

And this is really easy with Construct 2. We'll do it by displaying a message saying that the game is over and stop the ball.

To do this, we need to add a Text object. Go to the Projects window and right-click on Object types and choose a Text object. Place it on the Layout screen where you want the text to be displayed. Somewhere near the top.

Check out the Text object Properties:


The important property here is to make the Initial visibility to Invisible. You don't want this text to display until the game is over. And now to set that up.

We need to add one more event. We want to see what will happen is the ball hits the bottom edge. As you may recall, in the bouncing ball example in my earlier post on Construct 2, each of the four edges is an invisible box that is just a line. I called mine EdgeBottom.

Double-click on the Event Sheet and select Ball. You'll get this:


You are interested in Collisions and in particular, "On collision with another object". Select that and click on Next. 


Construct 2 wants to know what object you want to collide with. How about EdgeBottom?


Click on Done to end your Event. But now you must select an Action to go with that Event.

Click on Add action and choose the Text object. Then select "Set Visible" and make the visibility "Visible".

Next do the same thing and add a second action and then choose Text and this time select "Set Text" and give it the value "Game Over!"

Finally, to stop the ball, add a third Action for the ball. Under Bullet, select "Set Speed" and give it the value zero. Your ball will stop.

Here's what your Event sheet should look like:


That's it. You're done! Just press the big arrow at the top and run the game. You can export it and choose "Open Web App" which is the name of the Firefox OS Marketplace. If you want to put it in the Marketplace, just make sure you change the icons from Construct 2 to your own icons and that all your information applies to you, not to me or Construct 2 defaults.

This is just so cool! Now anyone can make a game for Construct 2.

Here is what the results looks like for Firefox OS:


And here is what it looks like when the game is over!


If you want to download a copy to run in Construct 2, you can get it at http://thulfram.com/1GAM/April%202014/PaddleFoxC2.capx

I'll be playing around with Construct 2 for the next few weeks, finding out other cool things it does and how to transfer those cool things to Firefox OS.

Stay tuned, but not iTuned!

Monday, January 20, 2014

Submitting an App (Game Programming)

I just submitted an app to the Firefox OS Marketplace and so can you! The app hasn't been accepted yet, and when I submitted it, my response was that I am 88 in a queue of 88 and that the estimated working time is 3 working days. How exciting!

I decided to submit my PaddleFox game that I wrote about at http://firefoxosgaming.blogspot.com/2014/01/paddlefox-game-programming.html.  The app is a very simple game that lets you hit a ball with a paddle. This game was a culmination of several posts and (very soon) I will have a page that lists the various technologies I write about. Essentially it uses SVG to create and move a ball and paddle, and uses the SVG getBBox method to detect collisions.

Here is what PaddleFox looks like:


Just so you know, I put this in the Marketplace as a free game. I intend to improve it in various ways as time goes on, and as soon as I figure out a way to get a web site and put it there, I'll also enter it in the One Game A Month site because the #1GAM people are really fun. I'm sure I'm the worst, but I'm shooting for doing all or part of one game a month for this blog, so why not?

Firefox OS Marketplace

Really, putting your game in the Firefox OS Marketplace is pretty easy. Prepare your app, make some icons, make a manifest, and submit it. If something goes wrong in the process, you can do it until it works.

The Application

My application was a simple 1-page HTML5 file and you can see the code and my explanation here: http://firefoxosgaming.blogspot.com/2014/01/paddlefox-game-programming.html. 268 lines of code with no bitmaps. I didn't do any music or sound effects because I wanted to keep it simple.

The Manifest

The manifest is a text file called manifest.webapp. This is a structured JSON file that specifies what the app does. I didn't have any special code that needed permissions. You just specify the name of the app and a short description, the launch path, who you are, and the language you support.

Here's mine:

{
  "name": "Paddlefox",
  "description": "Hit the ball with the paddle",
  "launch_path": "/index.html",
  "icons": {
    "60": "/icons/FB-60.png",
    "90": "/icons/FB-90.png",  
    "120": "/icons/FB-120.png",
    "128": "/icons/FB-128.png"   
  },
  "developer": {
    "name": "Bob Thulfram",
    "url": "http://firefoxosgaming.blogspot.com"
  },
  "default_locale": "en"
}


Here's the info from Mozilla Developer Network on manifests: https://developer.mozilla.org/en-US/Apps/Developing/Manifest. This text file uses a JSON format for the data. Here is the JSON specification http://json.org/ and in case you wanted to know, JSON stands for JavaScript Object Notation.

You don't really need to be an expert at JSON, but follow the examples and be sure you put the commas and brackets in the right place. And make sure that your paths and names are correct, especially for the icons!

Icons

You'll notice in the manifest above there are 4 icons. I got a warning saying I should have added 2 more sizes, but I got errors until I added the four I did. Originally there were only two icons you had to have, but now you must do the four sizes above (60, 90, 120, and 128). The optional ones are 32x32 and 256x256!

Here's my 128x128 pixel icon:


How did I make it? Well, no artists were involved, that's for sure. The most important part of my icon adventure was going here: http://www.mozilla.org/en-US/styleguide/products/firefox-os/icons/. That is part of the Mozilla style guide that shows you some of the issues with icons. The important part was the download at the bottom. All I did was to download the templates, load them into a pixel art editor, and make some changes. I used Paint Shop Pro but you can use Photoshop or anything else. I used Paint Shop Pro because I wanted to do some layers. I took the template, spilled some pixels of a different color on it, smeared things around, and slapped some type on top. I'm sure a monkey could do better. I did one icon at 128x128 and then resized the other three, making a total of 4 icons in all.

Once I had the HTML5 page (index.html) in the root of a folder and the manifest at the same level, and the icons in a folder below that, the next step was to zip them up. I used 7Zip but there are plenty of other zip file makers.

So, armed with a zip file containing my web page, manifest,and 4 icons, I then went to the Marketplace. But before I went, I read this great article on MDN: https://developer.mozilla.org/en-US/Marketplace/Submission/Submitting_an_app on submitting an app.

Submission

You submit your apps starting here: https://marketplace.firefox.com/developers/submit/. Actually, the first thing you should do is to get a Mozilla Persona account. Read about that here and get one https://login.persona.org/. You'll need it anyway if you want to buy an app later. Make one, buy one! You can read about how I signed up for Persona at http://firefoxosgaming.blogspot.com/2014/01/heroine-dusk-game-review.html.

Now that you have a Persona, sign in and accept the terms of working with the Marketplace. Then you go to a page that lets you choose what kind of app you want to submit. The first choice is free or paid/in-app-purchases.

Then you pick the hardware you want your app to run on.
  • Phone
  • Firefox Desktop
  • Firefox on Android
  • Tablet
I noticed that they didn't list the VIA APC yet!

Then the choice is packaged app or hosted. Packaged apps are zipped up and submitted to the Marketplace. Hosted apps are hosted on a web site you own. Some of these choices are made for you, depending on what you pick.

If you want paid/in-app-purchases, you must (at this time) only supply apps for the phone.You can choose to be packaged or hosted. If you want your app to be free, and you choose phone, you can be hosted or packaged. But if you want to do apps for the desktop, android,and tablet, not just phone, you can only be hosted and you must be free! Sound complicated, but when you get there, the buttons will only let you choose certain options, so know what you want before you go.

I chose phone, packaged, and free, because that's the easiest. That's what I wanted anyway.

Once you've made your choices, there's a button to click that lets you select the file you want to submit. One file, it must be zip, it must have a manifest, icons, and ... your app!

Then, if you did everything right, your file will pass the tests. I had some problems with the icons (not enough) and the JSON notation (commas) but each time I failed, I could go back, fix whatever was wrong, and then resubmit right there.

I did get a warning that they wanted those two other icons, but they weren't required. I also got a warning that my submission failed the CSP (Content Security Policy). The rules for CSP are here: https://developer.mozilla.org/en-US/Apps/CSP.

It gave me line number in my index.html, 28, and the contents of that line:

  <script>

I think this is telling me that I should put my JavaScript stuff in a separate file instead of between two script tags in the head. But it was only a warning so I'll research more and fix it when I submit improvements (unless it fails in the final submission process). They're very careful about not allowing JavaScript to be a vector for evil things.

Once I only had warnings, I went on. A few more questions. They wanted my privacy statement (I said I'm not gathering data or using it - but they have a nice template if you do something more complicated). They also wanted a description of the app, a web site, and an email for support. I did all of that, and then one last (easy) step.

They had a few questions to determine the age rating. My app had nothing that would offend anyone, so I just said no to all the questions and now have a certificate that was automatically placed in my submission saying that my game is safe for all ages.

Then I pushed the final button and got the notice that I'll be in the store when I go through that 88 person queue. I'll be curious how long it really takes. Let me know if you see my app in the store and I'll put a comment here and tweet about it.

By the way, now it says 88 out of 100 which means I didn't move forward in the line, but more people are piling up behind me!

Wednesday, January 15, 2014

PaddleFox (Game Programming)

One of the simplest games to create is a variation of Pong that is based on the real-life sport of Racquetball. You can play by yourself and don't need a partner. Just slam the ball against a court made of three walls and bat it back and forth. I wanted to be more unique to choose a name for this game, so after some thought and research, I picked PaddleFox.

Why pick a name? Part of this series of posts is to create real games, and right now seems like a good time to pull together a lot of the technologies I've been exploring to make a "real" game and see how to put it in the store. This isn't going to be the greatest game in the marketplace and I certainly wouldn't charge money for it. I might expand on it later. There's an absolutely fabulous game I do love that is on the Android called Juggle by those wizards of Dundee, Scotland, known as Denki. I recommend it and I'd like to try something like it as I build up more skill. (Essentially it is similar to the game I'm building today, but introduces more balls and different sized ones.)

I'll see about submitting this game to the Firefox OS Marketplace and keep you posted. As I improve it over time, I'll let you know about that too. But I also have lots more game techniques I want to explore that aren't about bouncing balls, and can't wait to get going on a space shooter, a platform game, and a lite RPG.

But on to today's game. There's a ball, there's a paddle, and that's it. Hit the ball and it bounces off. Miss the ball and the game is over (but you don't need a quarter to play over again). This game uses SVG, but you can do the same game by using the corresponding bouncing ball and collision techniques I wrote about for CSS and Canvas.

Here is ... PaddleFox!


Tested and run on a Geeksphone Peak, my new pride and joy. I feel guilty not playing with my ZTE Open. I know it is sitting in the corner missing me, but I'm hoping to get back to it when I can safely upgrade to Firefox OS 1.3 so I can start using the App Manager.

Basically this game combines the bouncing ball technology of creating SVG with JavaScript and the SVG DOM with the Collision Detection built into SVG with getBBox with a touch of Touch! SVG is still a largely undiscovered country for game programming (but see a good one in esviji).

So, here's the code:

<!DOCTYPE HTML>
<html>
  <head>
    <meta charset="utf-8">
    <title>
      PaddleFox
    </title>
   
    <style>
   
    #myHead
    {
      position:absolute;
      top: 10px;
      left: 10px;
    }
   
    #myPara
   
    {
      position:absolute;
      top: 60px;
      left: 10px;
    }
   
    </style>
    
    <script>

      // --- Global variables ---

      // Width and height of board in pixels
      var boardWidth = 320;
      var boardHeight = 460;
      var boardWidthPixels = boardWidth + "px";
      var boardHeightPixels = boardHeight + "px";
     
      var padMove = 20;  // Amount the paddle moves.
      var score = 0;     // Initial score.

      // URL for W3C definition of SVG elements
      var svgURL = "http://www.w3.org/2000/svg";
          
      // Variables for ball initial position.
      var ballHor = boardWidth / 2 - 20;
      var ballVer = 50;
      var ballHorPixels = ballHor + "px";
      var ballVerPixels = ballVer + "px";
     
      // Amount of vertical and horizontal change.
      // Think of this is a vector. Speed + direction.
      var changeHor = 5;
      var changeVer = 5;
     
        // Covers all versions of requestAnimationFrame.
        window.requestAnimationFrame =
        window.requestAnimationFrame ||
        window.mozRequestAnimationFrame ||
        window.webkitRequestAnimationFrame ||
        window.msRequestAnimationFrame; 
     
      // Page load event listener.
      window.addEventListener("load",
        runFirst, false);
       
      // Mousedown event listener.
      window.addEventListener(
        "mousedown", whereMouse, false);
                       
      // Runs when page loads.    
      function runFirst() { 

        // Define the game board as an SVG element.
        gameBoard =
          document.createElementNS(svgURL, "svg");
         
        // Width and height of the SVG board element.
        gameBoard.width.baseVal.valueAsString =
          boardWidthPixels;
        gameBoard.height.baseVal.valueAsString =
          boardHeightPixels;
         
        // You must append the board to the body.
        document.getElementById("pageBody").
          appendChild(gameBoard);
       
        // Define the ball as an SVG element.
        paddleBall =
          document.createElementNS(svgURL, "circle");
         
        // Width,  height, radius, and color of ball.
        paddleBall.cx.baseVal.valueAsString =
          ballHorPixels;
        paddleBall.cy.baseVal.valueAsString =
          ballVerPixels;
        paddleBall.r.baseVal.valueAsString =
          "10px";
        paddleBall.style.
          setProperty("fill","fuchsia","");
         
        // Attach the ball to the game board.
        gameBoard.appendChild(paddleBall);
       
        // Define the paddle.
        myPaddle =
          document.createElementNS(svgURL, "rect");
         
        // X, Y, width, height, and color of paddle.
        myPaddle.x.baseVal.valueAsString = "90px";
        myPaddle.y.baseVal.valueAsString = "400px";
        myPaddle.width.baseVal.valueAsString = "130px";
        myPaddle.height.baseVal.valueAsString = "20px";
        myPaddle.style.setProperty("fill", "darkcyan","");
       
        // Attach the paddle to the board.
        gameBoard.appendChild(myPaddle);
       
        // Color the page elements.
        pageBody.style.backgroundColor = "black";
        myHead.style.color = "red";
        myPara.style.color = "white";      
        
            // Start the game loop.
            gameLoop();
      }
       
      // Game loop. Runs as fast as it can.
    function gameLoop(){
     
            // Endless loop with requestAnimationFrame.
            requestAnimationFrame(gameLoop);
      
        // Move the ball.
        ballMove();        
    }
     
    // Move the ball.
    function ballMove() {
     
      // Changes are calculated but do not
      // take effect until next time through loop.
         
      // Calculate new vertical component.
      ballVer = ballVer + changeVer;

      // If top is hit, bounce off.
      if (ballVer + changeVer < 10)
        changeVer = -changeVer;
       
      // If bottom is hit, the game is over.
      if (ballVer + changeVer + 10 > boardHeight) {
        changeVer = -changeVer;
        // You missed!
        console.log("Hit bottom");
       
        // Game over - actions
        // Set the score to zero.
        score = 0;
        myPara.textContent = "Score = " + score;
       
        // Alert the player.
        alert("You missed the ball!  Start again");
       
        // Start over again.
        // Set ball position.
        ballHor = boardWidth / 2 - 20;
        ballVer = 50;
       
        // Set ball vector.
        changeHor = 5;
        changeVer = 5;
       
        // Set paddle position.
        myPaddle.setAttribute("x", "90px");
       
        // Exit here and don't do any more now.
        return;
      }

      // Calculate new horizontal component.
      ballHor = ballHor + changeHor;

      // If left edge hit, bounce off.
      if (ballHor + changeHor < 10)
        changeHor = -changeHor;
       
      // If right edge is hit, bounce off.
      if (ballHor + changeHor + 10 > boardWidth)
        changeHor = -changeHor;
       
      // Does a collision take place with paddle?    
      // Get bounding box of ball.
      bbBall = paddleBall.getBBox();      
      // Get bounding box of paddle.
      bbPaddle = myPaddle.getBBox();        
     
      // Compare bounding boxes.   
      // Is the ball intersecting the paddle?
      // Four conditions must be met.
      if  ((bbBall.x > bbPaddle.x) &&
        (bbBall.x < (bbPaddle.x + 140)) &&
        (bbBall.y > bbPaddle.y) &&
        (bbBall.y < bbPaddle.y + 10)){
          console.log("HIT"); 
         
          // If hitting the paddle, reverse vertical.
          changeVer = -changeVer;
         
          // Make a small spin to create variation.
          spin = Math.floor((Math.random()*5)) - 2;
          // Add spin to horizontal vector.
          changeHor = changeHor + spin; 
         
          // Bounce ball up to untangle from paddle.
          ballVer = ballVer - 20;
         
          // Increase score.
          score = score + 1;
          myPara.textContent = "Score = " + score;
      }         

      // Draw the ball with new coordinates.
      paddleBall.cx.baseVal.valueAsString =
        ballHor + "px";
      paddleBall.cy.baseVal.valueAsString =
        ballVer + "px"; 
    }

    // Handle mousedown event.
    // Tap once each time to move paddle.
    function whereMouse(evt) {
   
      // Get mouse coordinates.
      mouseX = evt.clientX;
      mouseY = evt.clientY;
     
      // Current paddle position.
      oldX = myPaddle.x.baseVal.value;   
     
      // Calculate which side click is on.
      // If tap is on right of center.
      if (mouseX > 160) {
        newX = oldX + padMove;
        // If new x would go off screen.
        if (newX > 210)
          newX = oldX;
      }
      // If tap is on left side of center.
      else {
        newX = oldX - padMove;
        // If new x would go off screen.
        if (newX < 10)
          newX = oldX;
      }
     
      // Move paddle.
      myPaddle.setAttribute("x", newX);     
    }   

  </script>
</head>
   
<body id="pageBody">
<h1 id="myHead">PaddleFox</h1>
  <p id="myPara">Score = 0</p>
</body>

</html>


268 lines of code. That's not too many! Here's how it works.

Shell

I use a standard HTML5 shell. The minimum you need to tell the browser that you're talkin' HTML5 and UTF-8. Here's the layout I use, but all this is up to you. The HTML5 part is not. Even though it is not directly about SVG, my post on CSS Shell is a good starter.

In general, here's how my shell is laid out. You can also call this a template, but I like shells, and Susie sells them down by the seashore!
  1. HTML5 minimum code
  2. CSS
  3. Globals
  4. Event listeners
  5. Page Load event handler
  6. Game Loop
  7. Function blocks
  8. Other event handlers
  9. HTML UI code (if any)
The HTML5 and Globals should be easy enough to figure out. I use globals when I want something to be accessible in any event handler.

CSS

Sometime I use CSS and sometimes I don't. When you are using SVG (which has cousins in CSS on its mother's side), you can avoid CSS, but it's always there in the background, cooking up delicious meals. Here's today's CSS:

    <style>
   
    #myHead
    {
      position:absolute;
      top: 10px;
      left: 10px;
    }
   
    #myPara
   
    {
      position:absolute;
      top: 60px;
      left: 10px;
    }
   
    </style>


I use the CSS here to position the heading and paragraph. If you don't absolutely position these text elements, the SVG pane will be drawn after these, but this will make it go off the bottom of the screen! When doing games, you need to make sure that everything is absolutely positioned.  Just to be different, I colored these text elements in code a little later:

        pageBody.style.backgroundColor = "black";
        myHead.style.color = "red";
        myPara.style.color = "white";      


I did this in the page load. I'm actually more comforable with JavaScript than CSS, but I'm learning CSS fast.

Event Listeners

Games are usually all about events, and you need to listen for them. Here are the listeners:

       window.addEventListener("load",
        runFirst, false);
      
      // Mousedown event listener.
      window.addEventListener(
        "mousedown", whereMouse, false);

The first is listening for the page load event and the second is looking for a mouse down event. On Firefox OS, the mouse down event is what I use for simple touch. Your finger is a mouse! You want just the mouse down, not the click (which is mouse down plus mouse up). Fast and Firefoxy!

Page Load Event Handler

I throw in everything here that should happen before you start running the game. This includes:
  1. SVG definitions for the SVG pane, the ball (a circle), and the paddle (a rect). This is explained in the SVG post about SVG with JavaScript and the SVG DOM with the Collision Detection built into SVG with getBBox
     
  2. Whatever else I want to set up (coloring the text, in this case).
     
  3. A simple call to the game loop. Game loops govern the action cycle in an arcade game and they've been around forever. 
Game Loop

This is a simple game loop. It just loops around and around, governed by requestAnimationFrame. All it does is draw the ball (ballMove).

Function Block

The only function I have is (that isn't an event handler or the game loop) is the one that moves the ball. This function, ballMove, does most of the heavy lifting. It does the following things:
  1. Calculate the new ball position based on the changes you made the last time through the loop. This is a little goofy, but works. The loop is always processing what happened last time through. For example, if you hit a ball, you bounce, but the actual bounce doesn't happen until you come back again. Fortunately the game loop is bringing you back several times a second, depending on the negotiation between requestAnimationFrame and your browser. First the vertical component of your ball's vector (direction of travel and speed) is calculated, later the horizontal component follows.

    ballVer = ballVer + changeVer;
  2. A check is made to see if you hit the top of the screen. If you did, you bounce!

          if (ballVer + changeVer < 10)
            changeVer = -changeVer;

     
  3. Next a similar check is made to see if you hit the bottom of the screen. Oh, oh! You don't want to do that. If you did, the following actions take place: your score is reset to zero, the player is alerted, the ball is reset to its original position, so is the paddle, and then you return to the game loop without drawing the ball in this function block.

          if (ballVer + changeVer + 10 > boardHeight) {
            changeVer = -changeVer;

            console.log("Hit bottom");
           
            score = 0;
            myPara.textContent = "Score = " + score;
           
            alert("You missed the ball!  Start again");
           
            ballHor = boardWidth / 2 - 20;
            ballVer = 50;
           
            changeHor = 5;
            changeVer = 5;
           
            myPaddle.setAttribute("x", "90px");
           
            return;
  4. Next you do the same for horizontal positions. Bounce off the left and right walls.

          ballHor = ballHor + changeHor;

          if (ballHor + changeHor < 10)
            changeHor = -changeHor;
           
          if (ballHor + changeHor + 10 > boardWidth)
            changeHor = -changeHor;
  5. Now its time to see if the ball hits the paddle or not. This is a smart ball and does all the thinking. The paddle just moves (but elsewhere). This is a simple process. Get the bounding boxes of the ball and paddle. Even though the ball is round, a box can be used to determine collisions. Then once you get the bounding boxes, use their data to check a rectangle that sits on top of the box. If the ball enters that rectangle, a collision takes place. That collision will then make the ball reverse its vertical vector component, add a small random change to the horizontal vector component (called spin), pop the ball up a bit so it doesn't stay tangled in the paddle, and adds +1 to your score.

          bbBall = paddleBall.getBBox();      
          // Get bounding box of paddle.
          bbPaddle = myPaddle.getBBox();        
         
          // Compare bounding boxes.   
          // Is the ball intersecting the paddle?
          // Four conditions must be met.
          if  ((bbBall.x > bbPaddle.x) &&
            (bbBall.x < (bbPaddle.x + 140)) &&
            (bbBall.y > bbPaddle.y) &&
            (bbBall.y < bbPaddle.y + 10)){
              console.log("HIT"); 
             
              // If hitting the paddle, reverse vertical.
              changeVer = -changeVer;
             
              // Make a small spin to create variation.
              spin = Math.floor((Math.random()*5)) - 2;
              // Add spin to horizontal vector.
              changeHor = changeHor + spin; 
             
              // Bounce ball up to untangle from paddle.
              ballVer = ballVer - 20;
             
              // Increase score.
              score = score + 1;
              myPara.textContent = "Score = " + score;


    The only tricky part is the actual collision detection.

                if ((bbBall.x > bbPaddle.x) &&
            (bbBall.x < (bbPaddle.x + 140)) &&
            (bbBall.y > bbPaddle.y) &&
            (bbBall.y < bbPaddle.y + 10)){


    This checks four conditions to make sure that the ball's bounding box is inside the paddle's bounding box and uses the && to say that all four must happen to trigger the collision.
  6. Finally if you didn't hit the bottom of the screen, the ball is drawn.

          paddleBall.cx.baseVal.valueAsString =
            ballHor + "px";
          paddleBall.cy.baseVal.valueAsString =
            ballVer + "px"; 
This is the only trick part, but it seems to work well. And unlike Canvas, you don't have to erase anything, you just move stuff. Well, CSS game programming can just throw stuff around, but only SVG can do really cool shape modification and filters (more about that later, lots more).

Mousedown Event Handler

 This is triggered any time you touch the screen. In order to make this a game, you have to do something. My thought is to make it simple, so you touch on the left half of the screen to move the paddle left, and touch on the right half to make it go right. Each time you tap the screen, the paddle will jump a specific number of pixels and you'll have to tap it again to move it again. This provides a small amount of challenge.

Interestingly enough, when testing this on desktop Firefox, the clicking to move is clumsy and slow. But on a phone, it's fast and very intuitive. No keyboard, no mouse, just your finger. Tap anywhere on the left to move left, etc.

The mousedown handler does the following:
  1. Get the coordinates of where the tap took place.
  2. Get the current paddle X position (we're only moving left and right).
  3. Calculate where the click took place. Center is at 160 pixels right of the left edge. If the tap is on the right, add padMove to the paddle X value. But check to make sure the paddle doesn't move off the right edge.
  4. Do the same for the left of center tap. Again, make sure you don't move the paddle off the left edge.
  5. Move the paddle!
Here's the code for the mousedown handler:

      mouseX = evt.clientX;
      mouseY = evt.clientY;
     
      oldX = myPaddle.x.baseVal.value;   

      if (mouseX > 160) {
        newX = oldX + padMove;

        if (newX > 210)
          newX = oldX;
      }

      else {
        newX = oldX - padMove;

        if (newX < 10)
          newX = oldX;
      }
     
      myPaddle.setAttribute("x", newX);     


Wrapping It Up

You just start the game and move the paddle, stopping the ball from its mad passion to slam into the bottom of the screen. Rack up your score and keep playing. Maybe even have fun. But the real point is to see how to pull together the elements of creation, motion, and collision to make a simple arcade game.

Next I'm going to try to put this in the Marketplace and relate my adventures. After that, more game programming, more game reviews, and so on until I run out of ideas (not soon). Any ideas you have or any simple game types you'd like me to create would be appreciated. Well, maybe not Call of Duty.

Written while listening to the soothing strains of the Panzer Dragoon Saga Memorial Edition soundtrack. One of my all-time favorite games, totally only on the Sega Saturn. I don't have it any longer but I still remember finishing it and really liking the world it took place in, one of archaeology and dragons.