Showing posts with label bouncing a ball. Show all posts

Wednesday, April 23, 2014

Bouncing Ball in Construct 2 (Game Programming)

Construct 2 is a game-making engine. With a few clicks, you can make almost any kind of game and publish it in an amazing variety of platforms. At last count, you could create games for the following:

The Web (HTML5)
Wii U
iPhone
Android
Windows 8
Windows RT
Windows Phone 8
Windows Desktop
Mac Desktop
Linux Desktop
Blackberry 10
Tizen
Facebook
Chrome Web Store
Amazon Appstore

and

Firefox Marketplace!!!

And it does this with no coding required!

You can try it out yourself for free at http://www.scirra.com and see what you thing. If you like it, you can buy a personal copy for £79 ($119) or a business copy for £259 ($399). While that may seem high, it is a one-time fee and you only need to pay for a business license if you earn more than $5000 USD. That's cheaper than most other similar products (GameMaker and Stencyl).


That's the Construct 2 monster you see when you boot up the actual game engine. Construct 2 was started by two brilliant brothers in London named Ashley and Tom Gullen, and their web site and forum is the most helpful and fun place for people using their product!

I've used Construct 2 in the past and even put up a (lame) game in the Chrome Web Store called Tilt-A-Twirl at https://chrome.google.com/webstore/detail/tilt-a-twirl/klabggekijaanbjbakdimcdikdhihhdn for a contest. I like coding and I think that coding in HTML5 with JavaScript, CSS, SVG, and Canvas is a lot of fun.

Construct 2 started out as a game engine to create HTML5 games. But it has grown rapidly! I first took notice of them again when they provided an export for games on the Wii U. Right now you can buy a game made in Construct 2 in the Wii U eShop called Block Drop U, a cool game that's a cross between Jenga and Angry Birds. Writing games for Nintendo hasn't been easy, but now it is!

Then, I was happily surprised to see that Construct 2 then supported exporting to Firefox OS. So I thought I would try it out and I'm very pleased. I'll write some games and share them with you and if you have been held back because coding in HTML5 looks complicated, you might want to see how easy Construct 2 is for making a game you can put in the Firefox OS Marketplace!

In keeping with tradition, my first game will be bouncing a ball, similar to the way that I already did in previous posts.

Bouncing Balls

CSS
http://firefoxosgaming.blogspot.com/2013/10/bouncing-ball-in-css-game-programming.html

Canvas Arc
http://firefoxosgaming.blogspot.com/2013/10/bouncing-ball-with-canvas-arc-game.html

Canvas Bitmap
http://firefoxosgaming.blogspot.com/2013/11/canvas-bitmaps-and-requestanimationfram.html

SVG Body
http://firefoxosgaming.blogspot.com/2013/11/bouncing-svg-part-1-game-programming.html

SVG JavaScript
http://firefoxosgaming.blogspot.com/2013/11/bouncing-svg-part-2-game-programming.html

SVG DOM
http://firefoxosgaming.blogspot.com/2013/11/bouncing-svg-part-3-game-programming.html

Whew! Six ways to bounce a ball in HTML5, all working in a Firefox OS phone. And what a trip down memory lane for me!

But now I'll show you a much simpler way to bounce a ball in Firefox OS, and one that will even prepare all the files for you to submit to the store.

Getting Started

For this demo, you just need a simple ball. I redrew mine slightly, making it 32x32 with the ball being solid and the rest transparent.


I went with 32x32 because I wanted to experiment with grid sizes and that seems like a good place to start. The old one was 20x20. Pixels, not furlongs.

Next I booted up Construct 2. It looks like this:


I won't try to explain how the user interface works. There are lots of tutorials, but I'll just say that there are windows on either side and top and that the game board will be in the middle.

Here's what Construct 2 looks like when you start a new project:


When you start, you can choose from a ton of different projects, depending on the type of game you want to create. I just created a blank one.

The project consists of a Properties window on the left, a Projects window on the upper right, and a Quick Access tool bar at the top. The contents of these windows will change as you progress. In the middle is the Layout for your game.

The first thing to do is set up the main details of your game. In Construct 2, there are many ways to work with various windows, so I'll give you one way and you can find others. To get the project started, click on New project at the top of the Project window at the top right.

This will set up the main project Properties in the window on the left so you can fill in the main details. Here's what my details are:


The first block (About) is unique to each game. The ID is created from the website name but the rest is obvious. The important thing in the Settings is the size. I chose 320x448 because that is roughly the size of the ZTE Open and not much smaller than the Geeksphone Peak. I chose the defaults for the Configuration section except that I chose Letterbox scale for the Fullscreen in browser and Portrait. You can fiddle with the rest and it's all documented very well by Construct 2. Essentially I'm picking something that will fit on a Firefox OS Phone.

Next I wanted to set up the Layout (game board). I clicked on Layout 1 in the Project window on the right. The Properies window on the left changes to reflect this, and here is my Layout 1 properties. By the way, you can have more than one layout so you can have different levels. Each layout can have multiple layers. Here's mine:


This is pretty simple. All I changed was to make the layout the same size as the screen I defined for the Project view: 320x448. The Margins are just the space outside of the actual layout.

Next I turned on the grid. Having a grid to place objects is very handy. You can do that by clicking on the View tab at the top and then selecting a grid size like this:


Snapping and showing are good things and the size is 32x32 pixels.

Everything is set up to start adding art and making them objects. To add the ball, double-click on the center of the screen, which should be Layout 1. If you don't see Layout 1 highlighted in the tabs at the top, click on that to make the layout active. You can tell if the tab is active because you can see a little X in the right of the tab. 

Here's the tabs showing that Layout 1 is active:

 
And here's one showing that Layout 1 is not active. This demo doesn't use event sheets but they are cool once you get more complicated games with ... events!


So anyway, double-click on the layout sheet. You'll bring up an Insert New Object dialog.


Double-click Sprite. The window will disappear and you'll get a cross-hair. Click where you want the sprite to go on your layout. When you do, you'll get a new dialog saying Edit Image: Sprite.


Click on the little folder near the upper left to insert an image. I picked my old 20x20 ball.


You'll see at the bottom that it says 20 x 20 but I wanted it to be 32x32. So all I had to do was click on the Resize button near the top right (a two-headed arrow) and then resize it.


Easy! Just click on the red close button at the very top right and your ball will be on the board known as Layout 1.


Pretty cool. Huh? But that's not a game yet and not even a ball bouncing. For it to bounce, we need walls. Four of them.

So next you want to insert invisible walls. They will be at the four edge of the screen. Here's how I did it. 

I inserted an object like the ball, but this time I didn't give it any art. I did the wall on the right first. Once you create an object, you can resize it on the layout. So I dragged it over to the right edge so it looked like this:


 I dragged it so that the wall is on the right side. It's the light purple rectangle. The right edge of the wall is flush with the right edge of the layout, and the top and bottom match.

Then I dragged the left edge of the wall so it is flush with the right edge of the board so it looks like this:


You can hardly see it, because now it is just a dark blue line with handles on the middle and ends. Handles are bits you use to drag an object. Be careful. Once you click elsewhere on the layout, the wall will vanish. But you can always see it again by clicking on the wall name in the Object types list of the Projects window. As you create each wall, you might want to give them names so you can identify them in the Projects window more easily. Create the other three walls, give them names, and then give the ball a name also, like "Ball". Your object list should look like this:
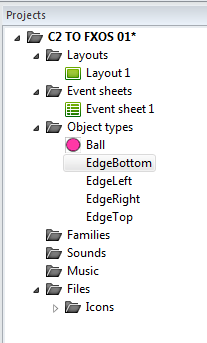

Object lists are great because you can see what objects you have, and by click on one in the list, that object will be highlighted on the board layout. Note that the Edges (walls) don't have an icon because they don't have art and are invisible.

Your objects are in place. Now you just need to set a few properties and your game is finished.

First let's set the properties of each wall. Click on one of the Edge objects. You'll see the properties on the left:


I didn't change anything here except to click on Add / edit Behaviors. This brings up the behavior dialog, which lets you define how objects ... behave!


In the screenshot above, I've already defined the one behavior you need for a wall. Solid! You get this by clicking on the + sign and adding Solid from an a list of object behaviors. The point of this is to make the walls solid so that the ball will bounce off them! Do this with all four walls and you are finished with the walls.

Next comes the ball. Do the same as before. Click on the ball object in the list, and then click on the Add / edit Behaviors button. This time you're going to add two behaviors:


Again, you're pick objects from a list by clicking on the + sign and then selecting a particular behavior. In this case, I'm making the ball be BoundToLayout so even if it slips past one of those walls I placed, it still won't leave the screen. The other behavior is called Bullet and is an example of what Construct 2 can do to make a hard task easy.  

Once I've picked the behaviors, you can change the details in the Properties window on the left.


The Bullet properties are well documented in the docs, but essentially what I am doing here is saying that the ball starts traveling at 400 and will bounce off solids. I set an angle (45) in the ball properties (we're looking at behaviors) to give it an angle. The coolest thing about using a bullet behavior is that when the ball bounces, it has a little bit of spin so that the ball won't keep bouncing in an exactly regular manner.

We've now set up the project, layout, objects, art, and behaviors.  What's left? Just click on the Run Layout button at the top (or press F5). The ball will start moving and bouncing in your default browser. 

I'll go over the details later of how to put this in a Firefox OS phone, but here is what it will look like in a browser:


I resized the browser so it would exactly match. But because I chose the Letterbox scale value, if I resize the browser slightly, black bars will appear to make up the difference.

Here's a wider version.


And a taller one:


And here is what it looks like on a ZTE Open:


And on the Geeksphone Peak:


And finally in the Firefox OS Simulator:


So even though there are several screens and properties to define, you'll quickly see that you only do a few things to get a particular effect, and the Construct 2 docs are great. And if you can't figure out how to do something, search in the forums and if that doesn't work, ask a question and someone will answer. The people in the forums are very polite and patient. More so than any other forums I've seen, which is why I've followed them so long and now they've followed me to Firefox OS.

Best of all, if you want to see how it works, you can just download the free version of Construct 2 and load my ball bouncing program here at http://thulfram.com/C2/Construct2.html. There's only one file there now, but I'll be adding more soon.

Compare these simple choices with the 90 lines in my CSS bouncing ball program or the 132 lines in the third SVG bouncing ball program.

For a while I'll be playing with Construct 2 and next I'll be adding a paddle and making a version of PaddleFox. The original I wrote in SVG was 268 lines and you can read about it at http://firefoxosgaming.blogspot.com/2014/01/paddlefox-game-programming.html. But as you can guess, it won't be a lot of extra work to add the paddle and bounce the ball off of it in Construct 2.

So stay tuned, but not iTuned!

Monday, November 18, 2013

CSS Shell (Game Programming)

I went back and revised the shell that I am going to use for Firefox OS CSS programming. Some of it is the same, but I added the following:

requestAnimationFrame

Instead of using this timer:

        gameLoop = setInterval(ballMove, 16);

I'm using requestAnimationFrame with a shim:

      // requestAnimationFrame browser variations
      var requestAnimationFrame =
      window.requestAnimationFrame ||
      window.mozRequestAnimationFrame ||
      window.webkitRequestAnimationFrame ||
      window.msRequestAnimationFrame; 


This makes for smoother animation and better battery life. Basically you're letting Firefox OS decide how fast the loop will repeat. And if you're running this in webkit or IE9, it will also work.

To use requestAnimationFrame, simply put it in the endless loop you want to use for your game loop. This will allow the loop to repeat, making things happen on a timely basis. Just put this in your loop and call the loop once:

      requestAnimationFrame(gameLoop);

The other major change is to create an event handler for page loading. The onXXX functions still work, but using event handlers is easier to use, debug, and cancel. So instead of:

      <body onload="playBall()">

Use this:

      window.addEventListener("load", getLoaded, false);

I like to have a standardized starting set of code which I call a shell. I'll be posting them as I go through a series of coding for collision testing for CSS, Canvas, and SVG.

Below is the code for the whole page. By the way, this was fun to run in Firefox OS and watch the Inspector display the coordinates of the ball in the DOM. Even though no code seems to run in the body, when the code runs, the Inspector shows you the rapidly changing:

      <div id="ball" style="left: 150px; top: 400px;"></div>

Find that in Web Developer -> Inspector. Also cool is that when in the Inspector mode, a little caption follows the ball around telling you that this is div#ball.


I'm starting to explore the new Firefox tools and how they work for debugging. Lots to learn.

So here's the code for my CSS Shell, as usual, tested and run in the little-but-loud ZTE Open, running Firefox OS 1.01.

<!DOCTYPE HTML>
<html>
 
  <head>
    <meta charset="UTF-8">
    <title>
      CSS Collision
    </title>
 
    <style>
        
      #ball
      {
        width: 20px;
        height: 20px;
        position: absolute;
        top: 200px;
        left: 100px;
        background-image: url(ball.png);
       }

    </style>
   
       <div id="ball"></div>    

    <script type="text/javascript">

    // Global variables    
      var boardWidth = 320;
      var boardHeight = 460;    
      var ballHor = boardWidth / 2;
      var ballVer = boardHeight /2;     
      var changeHor = 10;
      var changeVer = 10;
     
      // requestAnimationFrame browser variations
      var requestAnimationFrame =
      window.requestAnimationFrame ||
      window.mozRequestAnimationFrame ||
      window.webkitRequestAnimationFrame ||
      window.msRequestAnimationFrame; 
     
      // Load event listener
      window.addEventListener("load", getLoaded, false);

      // Get ball information.
      var myBall = document.querySelector("#ball");
     
      // Function called on page load.
      function getLoaded() { 

        // requestAnimationFrame for game loop
        requestAnimationFrame(gameLoop);
       
        // Output to debugger.
        console.log("The page is loaded.");
        }
     
      // Game loop
      function gameLoop() {
     
        // Repeat game loop infinitely.
        requestAnimationFrame(gameLoop);
     
        // Move the ball once.
        ballMove();       
        }
     

      // Calculate and move the ball.  
      function ballMove() {
     
        // Changes are calculated but do not
        // take effect until next time through loop.      
        myBall.style.left = ballHor + "px";
        myBall.style.top = ballVer + "px";
         
        // Calculate new vertical component.
        ballVer = ballVer + changeVer;

        // Top hit, reverse direction.
        if (ballVer + changeVer < -10)
          changeVer = -changeVer;
       
        // Bottom hit, reverse direction.
        if (ballVer + changeVer > boardHeight - 10)
          changeVer = -changeVer;

        // Calculate new horizontal component.
        ballHor = ballHor + changeHor;

        // Left edge hit, reverse direction.
        if (ballHor + changeHor < -10)
          changeHor = -changeHor;
       
        // Right edge hit, reverse direction.
        if (ballHor + changeHor > boardWidth - 10)
          changeHor = -changeHor;
        }

    </script>
  </head>
 
  <body>
  </body>

</html>


Thursday, November 7, 2013

Bouncing SVG - Part 3 (Game Programming)

In the first two parts of this series I wrote about how to use SVG to animate a bouncing ball. The first one was about putting the SVG in the body with tags and the second was about creating the SVG from scratch with JavaScript. In this, the third part, I want to write about a third way of doing SVG. This new way is not hardly documented anywhere and will take some work, but the payoff might be worth it, especially if performance is important to your game.


I've already talked about the DOM (Document Object Model) and you probably have heard about it. The DOM is actually the API of web browsers and you can use JavaScript to make the DOM do cool tricks. For example, if you have a sequence of paragraphs, you can change their order by manipulating the DOM. Every bit of a web page is part of the DOM. You can "walk" the DOM to see how your web page is constructed and in general mess around a lot.

But because SVG is independent and XML based, when you add it to the HTML DOM, something magical happens. The regular HTML DOM can get at the SVG and that was how the manipulation of SVG was done in Part 2 of this series:
  1. The SVG was added to the page with createElementNS.
  2. JavaScript was able to manipulate it through the HTML DOM with setAttribute.
But there was something hidden going on. There was ... another DOM!

This DOM is called the SVG DOM.

NOTE: actually, the DOM in the first two examples isn't really the HTML DOM, it is the XML DOM which is a sibling to the HTML DOM. It's easier to call it the HTML DOM. Everything about DOM is shadowy and hidden in Mirkwood somewhere. But right now let's just talk about the SVG DOM.

When you add SVG to your HTML5 web page, there are two ways to get at the SVG DOM. One way (in Parts 1 and 2) is going through the HTML DOM. The HTML DOM does some of the work for you, especially in converting some of the messy parts of the original SVG spec. But you pay a price for this conversion. When your calls go to and from the SVG DOM by way of the HTML DOM, things can slow down. For bouncing a ball, you won't notice any difference. But if you are doing something complicated, the difference can make ... a difference.

But you can sneak around the HTML DOM and call the SVG DOM. The way of doing it is different, but the way you do it is more like programming and less like markup. So here's today's program, similar in many ways to earlier ball bouncing, but using JavaScript in a way that is unique to SVG.

<!DOCTYPE HTML>
<html>
  <head>
    <meta charset="utf-8">
    <title>
      SVG in the SVG DOM
    </title>
    
    <script>

      // --- Global variables ---

      // Width and height of board in pixels
      var boardWidth = 320;
      var boardHeight = 460;
      var boardWidthPixels = boardWidth + "px";
      var boardHeightPixels = boardHeight + "px";

      // URL for W3C definition of SVG elements
      var svgURL = "http://www.w3.org/2000/svg";
          
      // Variables for ball initial position.
      var ballHor = boardWidth / 2;
      var ballVer = boardHeight /2;
      var ballHorPixels = ballHor + "px";
      var ballVerPixels = ballVer + "px";
      var changeHor = 10;
      var changeVer = 10;
     
      // Covers all bases for requestAnimationFrame.
      var requestAnimationFrame =
      window.requestAnimationFrame ||
      window.mozRequestAnimationFrame ||
      window.webkitRequestAnimationFrame ||
      window.msRequestAnimationFrame; 
     
      // --- Event listeners ---
     
      // Page load event listener (hear it loading?).
      window.addEventListener("load",
        runFirst, false);
               
      // Runs when page loads.    
      function runFirst() { 

        // Define the game board as an SVG element.
        gameBoard =
          document.createElementNS(svgURL, "svg");
         
        // Width and height of the SVG board element.
        gameBoard.width.baseVal.valueAsString =
          boardWidthPixels;
        gameBoard.height.baseVal.valueAsString =
          boardHeightPixels;
         
        // You must append the board to the body.
        document.getElementById("pageBody").
          appendChild(gameBoard);
       
        // Define the ball as an SVG element.
        paddleBall =
          document.createElementNS(svgURL, "circle");
         
        // Width,  height, radius, and color of ball.
        paddleBall.cx.baseVal.valueAsString =
          ballHorPixels;
        paddleBall.cy.baseVal.valueAsString =
          ballVerPixels;
        paddleBall.r.baseVal.valueAsString =
          "10px";
        paddleBall.style.
          setProperty("fill","fuchsia","");
         
        // Attach the ball to the game board.
        gameBoard.appendChild(paddleBall);
        
        // Start the game loop.
        gameLoop();
        }
       
      // Game loop.
      function gameLoop(){
     
          // Endless loop with requestAnimationFrame.
        requestAnimationFrame(gameLoop);
      
        // Move the ball.
        ballMove();        
        }
     
      // --- Move the ball. ---    
      function ballMove() {
     
        // Changes are calculated but do not
        // take effect until next time through loop.
         
        // Calculate new vertical component.
         ballVer = ballVer + changeVer;

        // If top is hit, change direction.
        if (ballVer + changeVer < 0)
          changeVer = -changeVer;
       
        // If bottom is hit, reverse direction.
        if (ballVer + changeVer > boardHeight)
          changeVer = -changeVer;

         // Calculate new horizontal component.
        ballHor = ballHor + changeHor;

        // If left edge hit, reverse direction.
        if (ballHor + changeHor < 0)
          changeHor = -changeHor;
       
        // If right edge is hit, do something.
        if (ballHor + changeHor > boardWidth)
          changeHor = -changeHor;
       
        // Draw the ball with new coordinates.
        paddleBall.cx.baseVal.valueAsString =
          ballHor + "px";
        paddleBall.cy.baseVal.valueAsString =
          ballVer + "px";   
        }    

        </script>
    </head>
   
    <body id="pageBody">
    </body>

</html>


This code starts out very much like Part 2. We're creating SVG objects in the browser with nothing in the body. But after createElementNS, the code looks weird. Here's how the SVG board size is set:

        gameBoard.width.baseVal.valueAsString =
          boardWidthPixels;
        gameBoard.height.baseVal.valueAsString =
          boardHeightPixels;


Actually, there were some new global variables. They were additions to the earlier ones, but instead of numbers, the height and width have to be set in pixels, not just a number. Behind the scenes, SVG uses a quirky numbering system which I'll get in to in another post later.

Anyway, you might think you could type:

                  gameBoard.width = 320;

But you can't. You have to add a few quirky things, but once you know those quirks, it's not that hard. Here's how to understand this code:

       gameBoard.width.baseVal.valueAsString =
          boardWidthPixels;


The first quirky part is that you have to throw in a new keyword, baseVal. This tells JavaScript to tell SVG that you want to use a normal SVG value for a length (length here means a measure of distance, and applied to height or width) the alternative is animVal, for animation, which you don't want. Why, you ask? Well, if you look up the SVG DOM page for rect (which is what we are defining) and can figure out that in normal SVG, you call it rect, but in SVG DOM, you call it SVGRectElement, you'll find it here: https://developer.mozilla.org/en-US/docs/Web/API/SVGRectElement.

Go look at that page. Mozilla has done a good job of putting the pieces there in the right order. But what you need to see at that page is that width and height are defined as a SVGAnimatedLength type. SVG animation was a cool idea back in the year 2000 (Conan O'Brien reference), but it never quite got itself together. You can animate SVG with JavaScript (don't ask about SMIL). Because of this, you have to make a slight twist and define the width and height with normal units, and use baseVal. And when you do that, you further need to feed the width and height values as strings, not as numbers. So we need to set our height and width as pixels.  You can get some clues here in the SVGLength topic on MDN https://developer.mozilla.org/en-US/docs/Web/API/SVGLength.

If you use this technique, you can do all kinds of programming tricks with SVG and you can bypass the DOM. Mozilla has a great page that lists all the various DOM categories and even what's in and what's out. It includes the three big DOM sets (DOM, HTML DOM, and SVG DOM). In the beginning was the DOM and then HTML DOM came forth and said let's make it easier, and finally SVG DOM came in and said let's party! https://developer.mozilla.org/en-US/docs/DOM/DOM_Reference. Talking about these is a pain, however, and I wish they'd give them easier names, like DOM Red, DOM Blue, DOM Green or something. Well, I guess they think they made it easy. The stock DOM is just DOM and it calls an element ... Element. The HTML DOM calls the same element HTMLElement (so you know it's the same if you whack off the HTML part), and the equivalent for SVG is called ... wait for it ... SVGElement. These prefixes actually have a reason, which is that they are used to keep the things with the same name apart. These prefixes are so you know what namespace you are in at any moment (if you're that poor overworked guy, the browser developer).

So all this info is in the Mozilla Developer Network, but you have to pick it apart. The SVG spec also has the same information, and the reason it is hard to follow is that specs are written for browser developers, not game programmers like you and me. But the really cool part is that all of these whacky things in the SVG DOM namespace are implemented in every browser that supports SVG. Mind you, not every blinking object and property actually are implemented because about 15% of SVG is just too obscure or not needed. Things involving Fonts, Text, and Animation are funky and/or just don't work and aren't a high priority for the browser developers.

But all these techniques work on every modern browser. Firefox! Chrome! Even IE! And even their friends on mobile devices and their cousins SeaMonkey! and Opera! And even that weird uncle in the background who made a pile of money in some way people don't want to talk about, Safari!

SVG is everywhere.

Oops, forgot one more cool quirk that SVG allows you to use in the SVG DOM. SVG and CSS are BFF! A lot of the values are right in line with CSS. So after you create the ball using this new SVG DOM technique, you can define the color by a CSS style, like this:

        paddleBall.style.setProperty("fill","fuchsia","");

Because this 3rd way of messing with SVG is working with the SVG DOM, everything is an object and objects have properties. Repeat this until it makes sense:

           HTML DOM = elements and attributes
           SVG DOM =  objects and properties

They are really the same concept, but the first is a markup thing and the second is a programming thing.

So anything that can have a property set can be set using "style". And one of the fun things about SVG is that it has a lot of style.

I'll be writing about this 3rd type of programming for SVG more in this blog but I want to get back to writing about game programming. I've written about three different game technologies you can use for drawing: CSS, Canvas, and SVG, and I'm hoping that you'll now be able to think about which way you want to go with programming. Here's my take on the three:

CSS - cool for a lot of games but needs more investigation on my part.
Canvas - almost everyone is using this now. It's good, but may not be the best in tight spaces.
SVG - lots of interesting possiblities, especially for tight spaces.

I'd like to do more with SVG for sure, but also see how CSS can fit in somewhere. So stay tunes. Next programming post, I want to get started on the next phase of game programming, which is touch! And a little bit more SVG for added flavor.

And, you don't need to pick just one. You can use any or all of these three technologies in the browser simultaneously. One of the best examples of this was a called Glow and showed who was downloading Firefox at any moment.


It showed a map of the world, drawn in SVG, and little points of light every place that someone was downloading Firefox, and the points of light were little dots created with Canvas. It was cool to watch and see how at night in the Americas, the downloads were in Europe, and the opposite was true for daytime in the Americas. Gone now, but you can read about it here.

Wednesday, November 6, 2013

Bouncing SVG - Part 2 (Game Programming)

In my first post on SVG (http://firefoxosgaming.blogspot.com/2013/11/bouncing-svg-part-1-game-programming.html), I covered the simplest way to use SVG in a game. Create your images using SVG tags in the body of your HTML5 document and then manipulate them using setAttribute to make things move.

That's not a bad way to work, but I have found that creating objects through JavaScript seems to make for faster action on the page. But there's a logical reason. The SVG tags have to be parsed and then translated into the DOM. For something simple like bouncing a ball, you won't see any difference. In fact, for the different ways I've written about for bouncing a single ball, you aren't likely to notice any difference because the work done by the browser is easy. In fact, for a lot of action games, you'll have to slow down the programming to be fair to the user. Ball bouncing needs to be fast, but not too fast. Although when I watch Olympic ping pong, it seems too fast to me.


So if you create your own SVG objects on the fly in JavaScript, the creation is faster and it is just cooler. I personally find it exciting to think that I'm starting with a blank web page and I'm adding thing to it in JavaScript. Maybe its a matter of taste. But it's nice to have options.

So, here's option 2 for SVG. Make it all in JavaScript and the DOM. Actually, in option 1, you were using the DOM to get at the attributes of the ball you created with tags. The main reason I started with tags is that there are tons of books, websites, and blogs explaining how to create SVG images using tags. For example, want to make an ellipse? Check out Mozilla's docs on the SVG ellipse.

But there aren't very many docs or examples on how to do scripting with SVG, because most people began by thinking that SVG is a way to represent static vector images and stopped there. Well, don't stop, keep going!

Here is the code for a bouncing ball using the second technique of SVG, creating art on the fly and using the DOM to get at it.

<!DOCTYPE HTML>
<html>
  <head>
    <meta charset="utf-8">
    <title>
      SVG in the XML DOM
    </title>
   
    <script>
   
      // --- Global variables ---

      var boardWidth = 320;
      var boardHeight = 460;
      var ballHor = boardWidth / 2;
      var ballVer = boardHeight /2;
      var changeHor = 10;
      var changeVer = 10;
     
      // Covers all bases for requestAnimationFrame.
      var requestAnimationFrame =
      window.requestAnimationFrame ||
      window.mozRequestAnimationFrame ||
      window.webkitRequestAnimationFrame ||
      window.msRequestAnimationFrame; 

     
      // URL for W3C definition of SVG elements
      var svgURL = "http://www.w3.org/2000/svg";
        
      // Page load event listener (hear it loading?)
      window.addEventListener("load",
        runFirst, false);
               
      // Run this first.
      function runFirst() { 
     
        // Define the game board as an SVG element.
        gameBoard =
          document.createElementNS(svgURL, "svg");
         
        // Width and height of the SVG board element
        gameBoard.setAttribute("width", boardWidth);
        gameBoard.setAttribute("height", boardHeight);        

        // You must append the board to the body.
        document.getElementById("pageBody").
          appendChild(gameBoard);
         
        // Define the ball as an SVG element.
        paddleBall =
          document.createElementNS(svgURL, "circle");
         
        // Width,  height, and radius of the ball
        paddleBall.setAttribute("cx", ballHor);
        paddleBall.setAttribute("cy", ballVer);
        paddleBall.setAttribute("r", 10);
        // Fuchsia = #FF00FF
        paddleBall.setAttribute( "fill", "#FF00FF");
         
        // Attach the ball to the game board.
        gameBoard.appendChild(paddleBall);
       
        // Start the game loop.
        gameLoop();
        }
       
      // Game loop - governed by requestAnimationFrame.
      function gameLoop(){
     
        // Restart the loop with requestAnimationFrame.
        requestAnimationFrame(gameLoop);
     
        // Move the ball.
        ballMove();        
        }
     
      // Move the ball.    
      function ballMove() {
     
        // Changes are calculated but do not
        // take effect until next time through loop.
         
        // Calculate new vertical component.
         ballVer = ballVer + changeVer;

        // If top is hit, change direction.
        if (ballVer + changeVer < -10)
          changeVer = -changeVer;
       
        // If bottom is hit, reverse direction.
        if (ballVer + changeVer > boardHeight - 10)
          changeVer = -changeVer;

         // Calculate new horizontal component.
        ballHor = ballHor + changeHor;

        // If left edge hit, reverse direction.
        if (ballHor + changeHor < -10)
          changeHor = -changeHor;
       
        // If right edge is hit, do something.
        if (ballHor + changeHor > boardWidth - 10)
          changeHor = -changeHor;
       
        // Draw the ball with new coordinates.
        paddleBall.setAttribute("cx", ballHor);
        paddleBall.setAttribute("cy", ballVer);
        }
       
      </script>
    </head>
   
    <body id="pageBody">
    </body>

</html>


Most of this is the same as earlier ball bouncing examples. HTML5, load the code, start the loop, check for changes, repeat! But if you read this from top to bottom, you'll notice that the body of the page is now empty. There's nothing there! Well, almost nothing. The body now has an id of "pageBody" and you'll need this to anchor your SVG objects to.

Here's the basic process for using SVG in a web page using JavaScript:
  • Create the object using createElementNS.
  • Modify it by setting the attributes.
  • Add the object to the page or another object.
createElementNS

This is similar to createElement but it creates an element in a specified namespace. This is needed so you don't get your SVG objects mixed up with your other objects. SVG is definitely its own animal, but it plays well with others if you feed it properly.

createElementNS starts out by creating the SVG pane. I call it a pane because I don't want to call it a canvas, but the idea is similar to the canvas in Canvas. The SVG pane is where you place all your SVG objects. All the objects have to fit inside the boundaries of the object or they won't display (you might want to do this to have objects hide off-screen until they are ready for their big scene).

The first use of createElementNS is this:

   gameBoard = document.createElementNS(svgURL, "svg");

I had previously defined an URL (path to a web site) for svgURL.

   var svgURL = "http://www.w3.org/2000/svg";

SVG uses this URL to clue the browser in that we are talking about SVG as defined in the year 2000. Maybe someday they will change this, but right now this works for everyone for SVG. It says "I'm SVG and I'm special."

The second parameter of createElementNS is "svg". You can call it anything you want, but it is the name of the newly created element. However, you want to assign the value of createElementNS to a variable. I picked gameBoard and that's what you use to grab on to the SVG pane.

setAttribute

Once you've created your SVG object, it's just floating in space somewhere but it has no color, size, or odor. That's no fun. You need to assign it values. For the SVG pane, you want to give it a size and nothing else because for this example, the SVG pane is just a container that the ball will bounce around in. So this code will define the size:

        gameBoard.setAttribute("width", boardWidth);
        gameBoard.setAttribute("height", boardHeight);


 The board width and height were previously defined as 320x460, the size of my lovely little ZTE Open phone.

appendChild

The third step is to attach your SVG object to the web page (or another SVG object). You do this by using appendChild. Here's the code to attach the object:

        document.getElementById("pageBody").appendChild(gameBoard);

This can be tricky to read as it has three parts:
  1. The word "document" which is the page document.
  2. getElementbyID("pageBody") which is the way that you grab the page body.
  3. appendChild(gameBoard) which adds the SVG pane to the body.
The three pieces are joined by dots. Essentially you're adding a new element to the existing page element which in turn is part of the whole document.

At this moment, when you  add the SVG pane as a child of the page, the SVG pane is now part of the page. Because we didn't give it any color, it doesn't look different. But its there and it says, "I am SVG and I am 320x460 wide and high. Hear me roar!"

Not much fun, yet. Now to create the familiar Fuchsia ball, you just repeat the three step process above.
  1. Create the ball.
  2. Give it attributes.
  3. Attach it to the SVG container.
Here's the code that does this:

        // Define the ball as an SVG element.
        paddleBall =
          document.createElementNS(svgURL, "circle");
         
        // Width,  height, and radius of the ball
        paddleBall.setAttribute("cx", ballHor);
        paddleBall.setAttribute("cy", ballVer);
        paddleBall.setAttribute("r", 10);
        // Fuchsia = #FF00FF
        paddleBall.setAttribute( "fill", "#FF00FF");
         
        // Attach the ball to the game board.
        gameBoard.appendChild(paddleBall);


At the moment this code runs, the ball will appear on the screen. The rest of the code is similar to the other examples. And in the ballMove section, you move the ball with this code:

        paddleBall.setAttribute("cx", ballHor);
        paddleBall.setAttribute("cy", ballVer);


which was used in the first SVG example.

There you have it. Create your objects, give 'em attributes, attach them to something, and bang 'em around! What could be easier? This technique isn't well documented, but it works and you can get the attribute names and values from the Mozilla docs at https://developer.mozilla.org/en-US/docs/Web/SVG/Element. There are lots of elements, but luckily Moz has sorted them into 13 categories further down the page. Working with paths can be tricky, but you can draw a path with Inkscape, save it as SVG, and see what the path actually is in numbers and letters.

But there's one more way to do SVG that is even cooler. In a complicated game, this third way will make everything fly. Stay tuned!

Bouncing SVG - Part 1 (Game Programming)

Earlier in this blog I wrote about bouncing a ball in CSS and several posts about bouncing a ball with Canvas. But there's a third web technology that might be perfect for some types of games, and its name is SVG. You may have heard about it, you may know that SVG stands for Structured Vector Graphics, but you probably don't know more than that, because the story of SVG is one of starts and stops, success and failure, and yes, slowly but surely, SVG keeps marching on. I won't bore you with the whole story, because this set of three posts is all about the three ways to use SVG to bounce balls so you can make choices about the graphic technology you want to use to make games for Firefox OS phones.

In the late 90's, the world was discovering the web. But the web was slow, especially when it came to graphics and pictures. Why not use vector graphics and describe them mathematically? Just a few lines and you have a fast-loading picture. Microsoft came up with one system (VML) and Adobe came up with another (PGML). Some others became interested and a new standard was invented that took parts of both and combined them to make SVG. It was a cool dream, but it didn't quite come together.

Microsoft didn't want to support SVG and they stuck with VML but didn't really promote it as a graphics language. The main use for VML was to represent Office Art for Office 2000, but not much else. Adobe promoted SVG but it was a constant uphill battle because without Microsoft support, nothing much was going to happen. VML was forgotten, and even though there were a dozen books about SVG, nothing much happened. 

One of the main reasons for the sidelining of SVG was that the Internet was speeding up fast and graphics now loaded just fine, thank you. It was a bitmap world!

Until Tim Bernars-Lee wrote a prominent article that called attention to the fact that Microsoft wasn't supporting important standards like SVG. Anyone else might have been ignored, but Tim was the founder of the Internet, so Microsoft decided to hire some new folks and make Internet Explorer support web standards (they'd shut down the team and sent them over to DirectX, allowing Firefox and Chrome to take up the slack).

So SVG was now implemented in most browsers, but the story doesn't end there, at least for game programming. Most everyone who knew about SVG looked at it as a lightweight way to have vector drawings. Professional illustrators had been doing this for years (with ... Illustrator). But as a static art format, SVG wasn't all that interesting.

The final thing that made SVG really useful was that when HTML5 was being created, some bright person decided it might be cool to have SVG be supported as if it were HTML. This was really cool because before that, SVG was seen only as an XML format. Nice, but a pain to work with. 

But by being able to treat SVG as a HTML, you could code that would put SVG shapes, lines, and paths in your web page. For example, the code below will create a red circle in a web page using HTML5.

<!DOCTYPE html>
<head>
</head>
<body>
<h3>This is SVG</h3>
<svg width="120" height="120" >
<circle cx="60" cy="60" r="50" fill="red" />
</svg>
</body>
</html>
And here is what it looks like:

All that I did was to add the SVG element, define its width and height, and then inside the element, I defined a red circle with a center of 60,60 and a radius of 50 pixels. SVG is still XML underneath, but you can treat it as any other element, and SVG has a lot of things it can do: shapes, paths, shading, text. Everything is defined by a markup language, and now it fits right in with HTML like they were siblings (they both have the parent of XML).

And you might ask yourself, how well is SVG supported, now that Internet Explorer supports it (and who cares about them anyway)? Chrome 4 and Firefox 2 were the first supporters, but right now, according to that wonderful site, Can I Use?, all the major browsers support SVG.(Opera Mini was the last holdout). And of course, Firefox, Firefox OS, and Firefox for Android support it too. 

But, if you look closely at the Can I Use? statistics, it says 84% support. The reason for this is that the SVG specification http://www.w3.org/TR/SVG/ is an extremely complicated document and has a lot nooks and crannies that aren't supported by anyone and may never be. The spec is still at version 1.1 (Second Edition) and change is slow. Parts that are not likely to be complete include typography and animation. But 84% of a huge spec is just fine (and the other 16% you don't care about unless you are a mad typographer.

The point here is that SVG is now in every browser, it does graphics with vectors, and its now much easier to use because you can treat it like any other HTML elements. It's right there for the taking! But because of the checkered history, people got excited about SVG (a dozen books!), but then lost interest when Microsoft wouldn't play along. And the Internet got fast, so no one cared anyway.

So why bother? SVG isn't just a pretty face. It has hidden depths, very deep depths. Here's the secret:

SVG CAN MOVE!

SVG can be moved, shaken, stirred, and in general, messed about with. Every element and attribute can be manipulated with JavaScript. So make your game bits and move them around. Because there are no bitmaps, you can have very lightweight graphics, and lightweight is cool on a Firefox OS phone. And Firefox has a pretty extensive set of reference pages on SVG at https://developer.mozilla.org/en-US/docs/Web/SVG. Of course!

Let's move something. How about a bouncing ball? 

But before I start throwing code (and fuchsia balls) at you (and after all that boring Internet history), I need to explain why there are three basic ways to use SVG in HTML5.
  1. The easiest way is to build your SVG art in the body of the browser. I did this just a few paragraphs ago by making a red circle. But the red circle can be manipulated by JavaScript. You can change the size, color, and position very easily. You can stretch it, mangle it, whatever you want. But unlike Canvas, SVG doesn't leave anything behind when it changes. The new size, color, position are preserved in the web page memory. None of this annoying draw, move, erase old, repeat. Just draw and move!
     
  2. The next way is to create all your SVG element and attributes on the fly with JavaScript. Want a circle? Make it in JavaScript. This all of a sudden becomes programming instead of markup language. You create elements, you modify them, and you do it all in JavaScript. You do this by using the HTML DOM (Document Object Model). You create SVG objects, define their attributes, and it is magic! More about this with the next programming post.
     
  3. But there's more. SVG has its own DOM. When you programmed SVG with method #2 (and actually #1 for the JavaScript part), you were talking to the SVG DOM through the HTML DOM.It turns out there is a way to go directly to the SVG DOM, and bypass the HTML DOM. This is faster and you can do even more manipulation. It's definitely tricky,but gives you greater persormance and control. And if you know how to read the SVG specification, all the answers are there. More about all this DOM stuff in the second programming post after this (sandwiched in with game reviews). 
Today's post will cover the first technique. Create an SVG object in the body with SVG tags, and then manipulate it with JavaScript. I'll use a lot of the same structure I used for CSS and Canvas, and the look and feel of the output will be the same, and, like all the other code I've put in this blog, it has been tested on Firefox OS on the ZTE Open phone.

Here's the code:

<!DOCTYPE HTML>
<html>
  <head>
    <meta charset="utf-8">
    <title>
      SVG in the body
    </title>
   
    <script>
   
      // Global variables
     
      var boardWidth = 320;
      var boardHeight = 460;     
      var ballHor = boardWidth / 2;
      var ballVer = boardHeight /2;
      var changeHor = 10;
      var changeVer = 10;
     
      // Covers all bases for various browser support.
      var requestAnimationFrame =
      window.requestAnimationFrame ||
      window.mozRequestAnimationFrame ||
      window.webkitRequestAnimationFrame ||
      window.msRequestAnimationFrame; 


      // This function is called on page load.
      function drawGameSVG() {
       
        // The page is loaded.
        console.log("The page is loaded.");   

        // Start the game loop.
        gameLoop();
      }
     
      // Game loop.
      function gameLoop() {
     
        // Move the ball once each loop.
        ballMove();
     
        // Restart the loop with requestAnimationFrame.
        requestAnimationFrame(gameLoop);   
      }

       // Move the ball.   
      function ballMove() {
     
        // Changes are calculated but do not
        // take effect until next time through loop.
       
        // Set the SVG attributes of the ball.
        ball.setAttribute("cx", ballHor);
        ball.setAttribute("cy", ballVer);
         
        // Calculate new vertical component.
         ballVer = ballVer + changeVer;

        // If top is hit, change direction.
        if (ballVer + changeVer < -10)
          changeVer = -changeVer;
       
        // If bottom is hit, reverse direction.
        if (ballVer + changeVer > boardHeight - 10)
          changeVer = -changeVer;

         // Calculate new horizontal component.
        ballHor = ballHor + changeHor;

        // If left edge hit, reverse direction.
        if (ballHor + changeHor < -10)
          changeHor = -changeHor;
       
        // If right edge is hit, do something.
        if (ballHor + changeHor > boardWidth - 10)
          changeHor = -changeHor;   
      }

     </script>
  </head>
 
  <body onload="drawGameSVG()">

    <!-- Create the SVG board. -->
    <svg width="320" height="460" id="board" >
      <!-- Create the ball. -->
      <circle cx="150" cy="150" r="10" fill="Fuchsia" id="ball" />
     
    </svg>
  </body>

</html>


The body of the page does two things:
  1. Call the drawGameSVG function when the page loads.
  2. Creates an SVG container with the id of "board" and a ball with the idea of "ball". You need to define these with an id so JavaScript can grab them later. SVG always needs a container to start with. The ball is the only visible aspect and the properties of position (cx,cy), radius (r), fill (fuchsia), and id (ball) are needed to have a complete ball.
The JavaScript is nearly the same as the Canvas code. It starts the game loop, uses requestAnimationFrame to keep the loop going, but uses some new commands to actually move the ball once the new position has been calculated:

        // Set the SVG attributes of the ball.
        ball.setAttribute("cx", ballHor);
        ball.setAttribute("cy", ballVer);


When the ball was defined in the body with SVG tags, it had the id of "ball". That id is used here, and the attributes of the ball are modified in the function called ballMove. The method setAttribute is used to change the definition of the "cx" and "cy" positions to match whatever the new ball position is (as defined by ballHor and ballVer). ball is an object, and because HTML5 treats SVG elements as HTML elements, you can change any attribute by using setAttribute.

So, that's it. Not so hard, really. You can check out the MDN SVG pages, and especially look at the tons of samples they have at https://developer.mozilla.org/en-US/docs/Web/SVG/Element. SVG is huge, but I'll try to cover it as I go along, because there's a lot there that can be of value to game developers using HTML5.

Also it might be good to say that if you're not patient enough to do elaborate drawings in SVG by hand coding every twist and turn, you don't have to. There are two very excellent drawing programs that support SVG extremely well. The first is Inkscape, which is a free open source program that is just astounding. I'll talk more about Inkscape later, but it is worth checking out, and is 100% based on SVG. The other SVG art program is Adobe Illustrator, which is not free, but is also now supporting SVG pretty well. But my heart is with the wonderful folks at http://inkscape.org/ I love their motto: "Draw freely."

As with this post, and any others, if I didn't express something well or you have questions, make a comment and I'll try to answer it. This game programming stuff is complicated, especially with all the tons of technologies available free in Firefox OS!